X-Plane Mobile Manual
Last updated:
Introduction to X‑Plane Mobile
Welcome to the world of airliners, general aviation planes, helicopters, and fighters—all in one app, and all optimized to fill beautiful, high-resolution mobile device screens. X‑Plane Mobile is the most complete and realistic mobile flight simulator available.
X-Plane Mobile is based on the most powerful, versatile, and accurate flight simulator in the world—the same simulator used by companies like NASA, Boeing, and Lockheed Martin. Using this flight model, it’s easy to believe you’re actually soaring through the clouds over Hawaii, Alaska, Austria, and more.
Updates to the X‑Plane simulators will be released periodically. We’ll be making improvements to the graphics, flight model, and interface technology, and releasing them as free updates available through the App and Google Play Stores. We have big plans for the future of the mobile sim!
About This Manual
This is version 11.7 of the manual for X‑Plane Mobile. To use this manual, you can jump to a section by clicking its title in the table of contents on the side. Clicking on terms highlighted in blue like this will take you directly to the relevant text or section. To search for a specific term or set of words, press “ctrl” (“command” on a Mac) + “f” to be taken to the term anywhere in the document. For a PDF version of this manual, use an HTML to PDF converter such as pdfcrowd.com. If you encounter any unfamiliar terminology, consult the Glossary of Terms at the end of this manual for definitions of many common aviation terms.
Device Requirements
For people with Apple devices, X‑Plane Mobile requires an iPhone or iPad running the iPhone operating system iOS 13 or newer.
X-Plane Mobile is also available on Android devices that run Android 6.0 Marshmallow or newer, that supports OpenGL ES 3.0 or newer.
App Integration
Using certain aspects of X‑Plane Mobile requires accounts with external applications such as Game Center, Google Play Game Services or social media.
A free account with Game Center or Google Play is required to track your scores for completed tutorials and challenges. To set up an account, find and tap the app icon, then follow the instructions to log in or create a free account.
Completing tutorials or challenges will also allow you the opportunity to post a comment to Facebook or Twitter as long as you are logged in. To do so on Apple devices, open the Settings app and tap the social media account from within the list. Tap your account name to enter your password.
To use the social media sharing features on Android devices, you must first install the Twitter or Facebook app from the Google Play store. Once installed, ensure you are logged in and synced in the General tabs of the device’s settings.
Getting Started
Download the free X‑Plane Mobile app from the iTunes App Store and install it on an Apple mobile device or tablet (iPhone, iPad, or iPod Touch). If you have an Android device, download the free app from the Google Play Store.
Most devices support multiple screen orientations. It is strongly recommended that you lock your device’s screen orientation prior to starting any flights in the X‑Plane application.
The simplest way to do this on an Apple device is to swipe up from the bottom of the screen to bring up the Control Center, then tap the icon that looks like a lock inside a circular arrow. Lock the screen of Android devices by swiping from the top of the screen to bring up the notifications center, then tap the icon that looks like a screen with a circular arrow. The screen is locked in its current orientation when the icon is gray.
To get flying, tap the blue X‑Plane icon to start the app. If requested, log in with your Apple ID or Google Play account, which will allow you to make in-app purchases.
Note: To use any of the social media sharing functions, you must also be logged into your social media account. See the section App Integration for more information.
The first time you start the app, you will be taken through the X‑Plane Basics tutorial which will show you the ins and outs of flying in the app. If you would prefer to skip the tutorial, tap the “Skip” button at the bottom of the screen until you are able to choose to quit the tutorial entirely.
The image below shows the home screen that appears after completing the initial tutorial, or at start up every time you use the app thereafter.
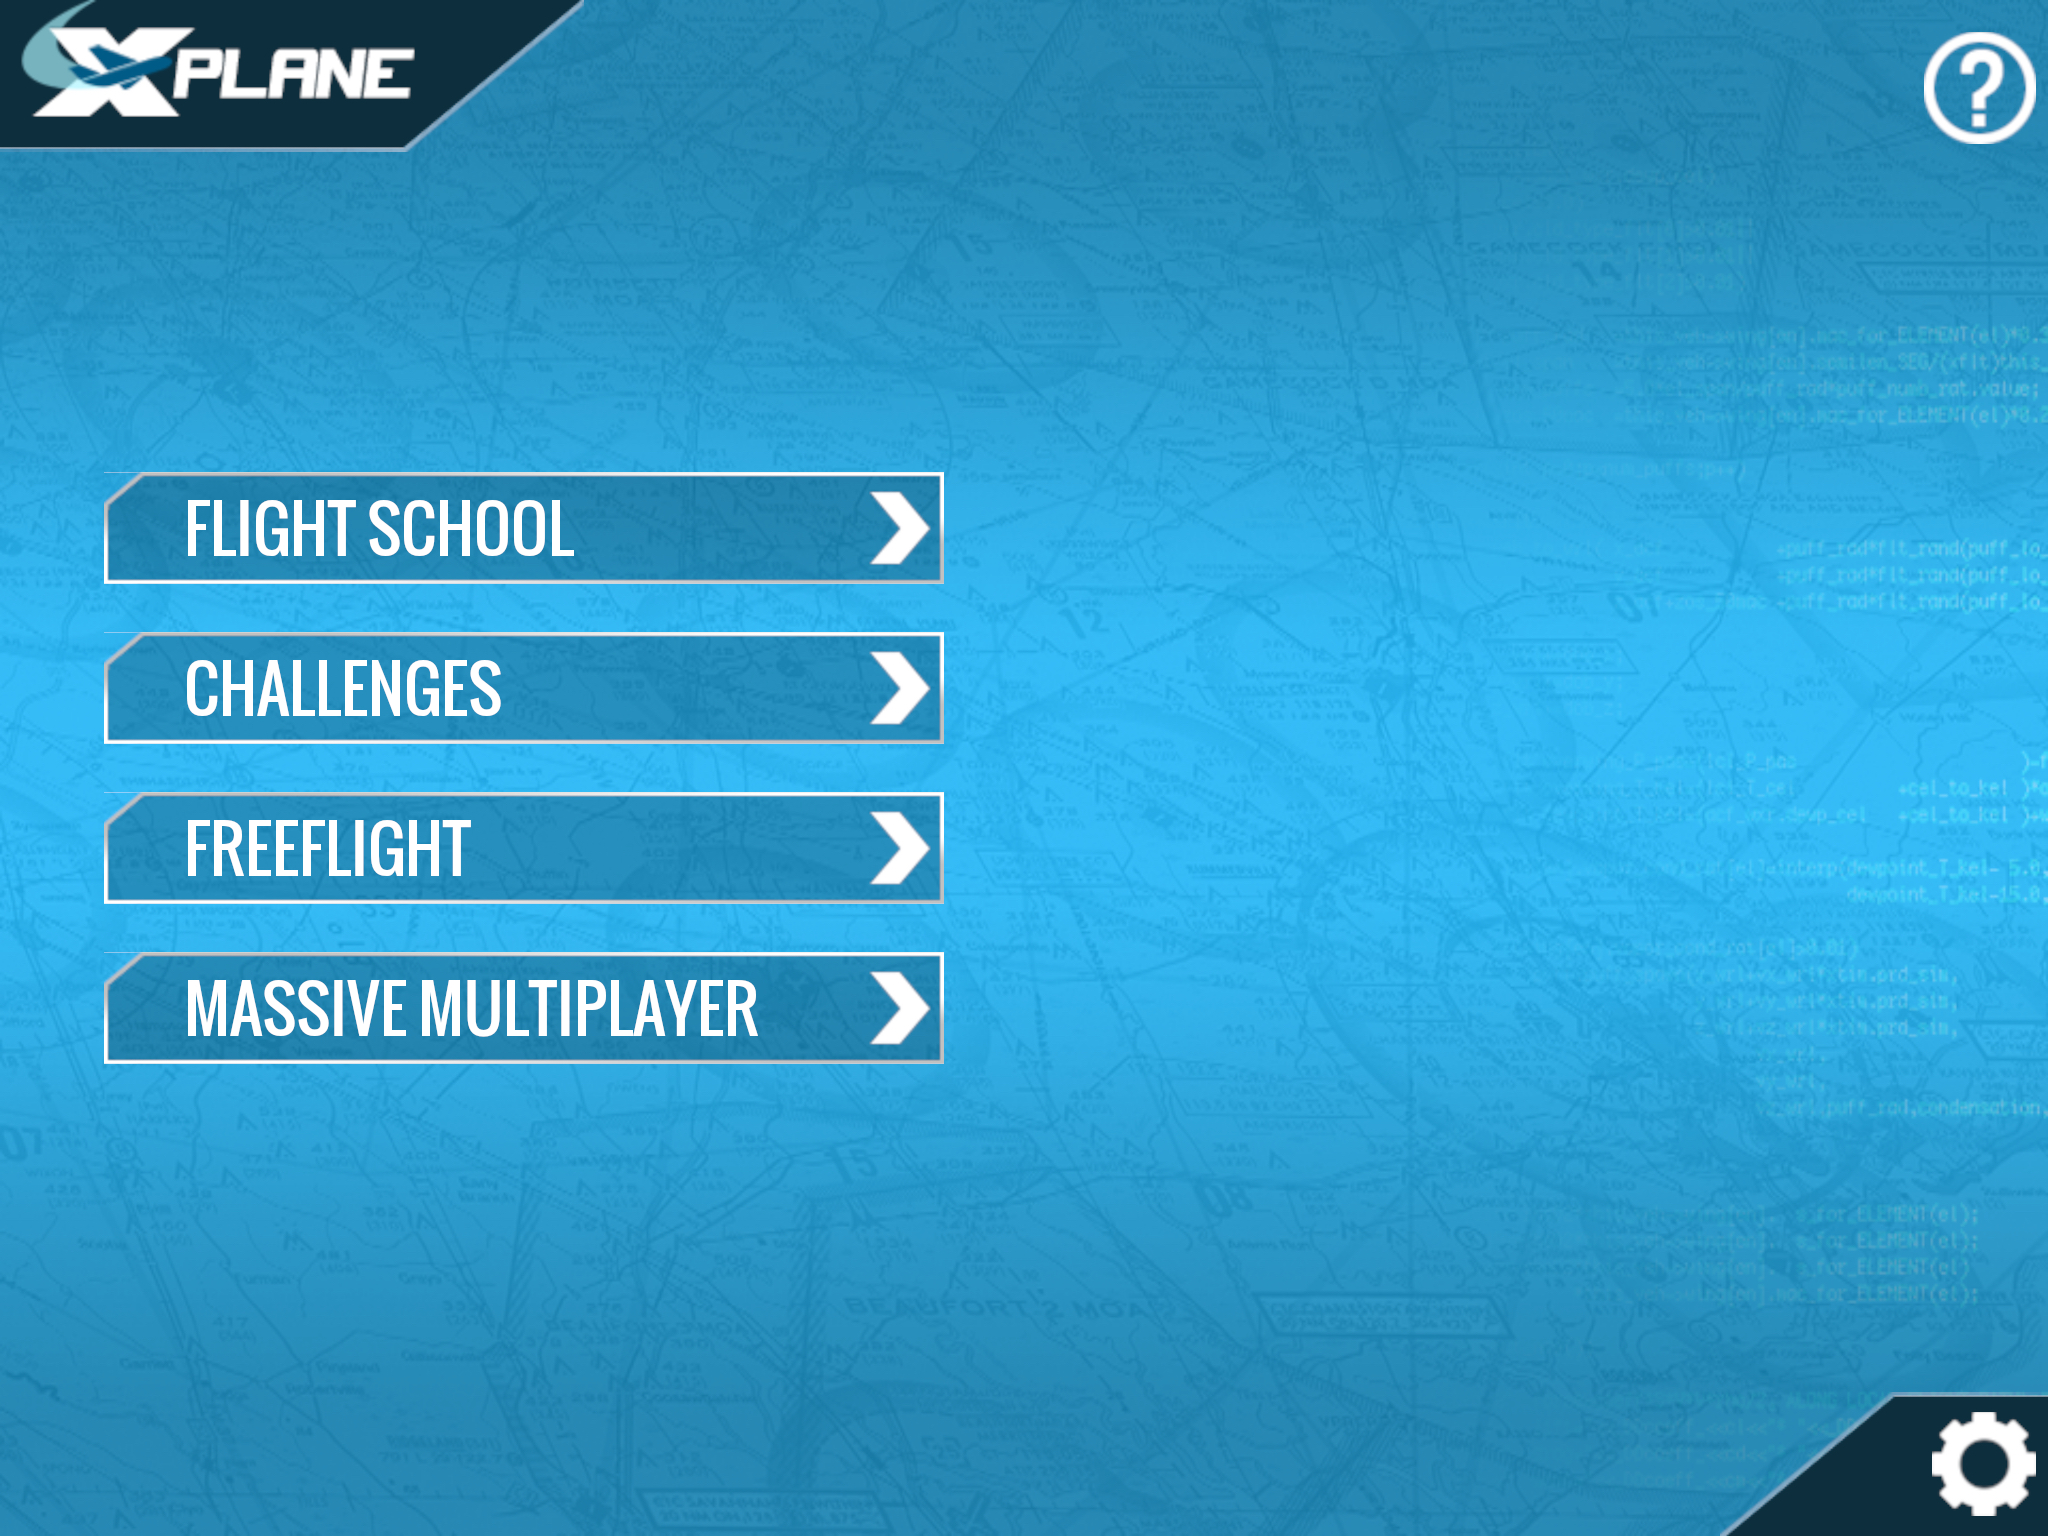
Figure 1: The first screen of X‑Plane Mobile
Home Screen
Here is a brief overview of each option on the starting screen.
Any time you see the question mark in the top left or right corner of the screen, you can tap it for a detailed explanation of your options in that screen. The gear icon in the bottom right corner accesses the settings.
Flight School: Tap this to open up the Tutorials section where you can learn the basics of the controls, takeoff, landing and more. See the section Flight School or the online list of tutorials for more details.
Challenges: Tapping this option will open the flight challenges, which range from instrument malfunction to canyon races and everything in between. See the Challenges section or online summary page for more information.
Freeflight: In this option you can set up a custom flight scenario. Pick a plane and start flying, or customize the experience with additional options. The Freeflight section has additional details.
Massive Multiplayer: Here you can join a massive multiplayer flight with many other players around in the world. See the section Massively Multiplayer Online (MMO) for more details.
Adjusting the Settings
There are five tabs along the top of this screen that sort the settings into subcategories. Let’s start with the General tab.
First up on the General Tab is Cockpit Preferences. Uncheck the “Draw manipulator hotspots” box if you would prefer to not see the colored manipulator boxes when you press and hold on screen. Tapping the “Recalibrate” button will center the flight controls based on how the device is positioned at that time.
Tap “Clear Downloaded Cache” to delete everything that has currently been downloaded to the device, such as aircraft, scenery, and nav data. This will free up your device’s disk space to the level of a fresh install, but note that you will have to re-download some of the files to fly again.
Tapping the “About” button will show which version of the app you are using. (See the section “Updating the App” for instructions on how to download the latest version if your copy is out of date.) From the About screen you can also view X-Plane’s legal documents such as its privacy policy or copyright and licensing information.
If you are using Google Play Game Services, you can also sign in or out from this screen.
In the Sound tab you can use the sliders to adjust four different volume levels.
The Graphics tab allows you to toggle a frame rate counter that displays while in a Freeflight. Use this information to determine if you should adjust the graphics level slider for low, medium or high rendering effects.
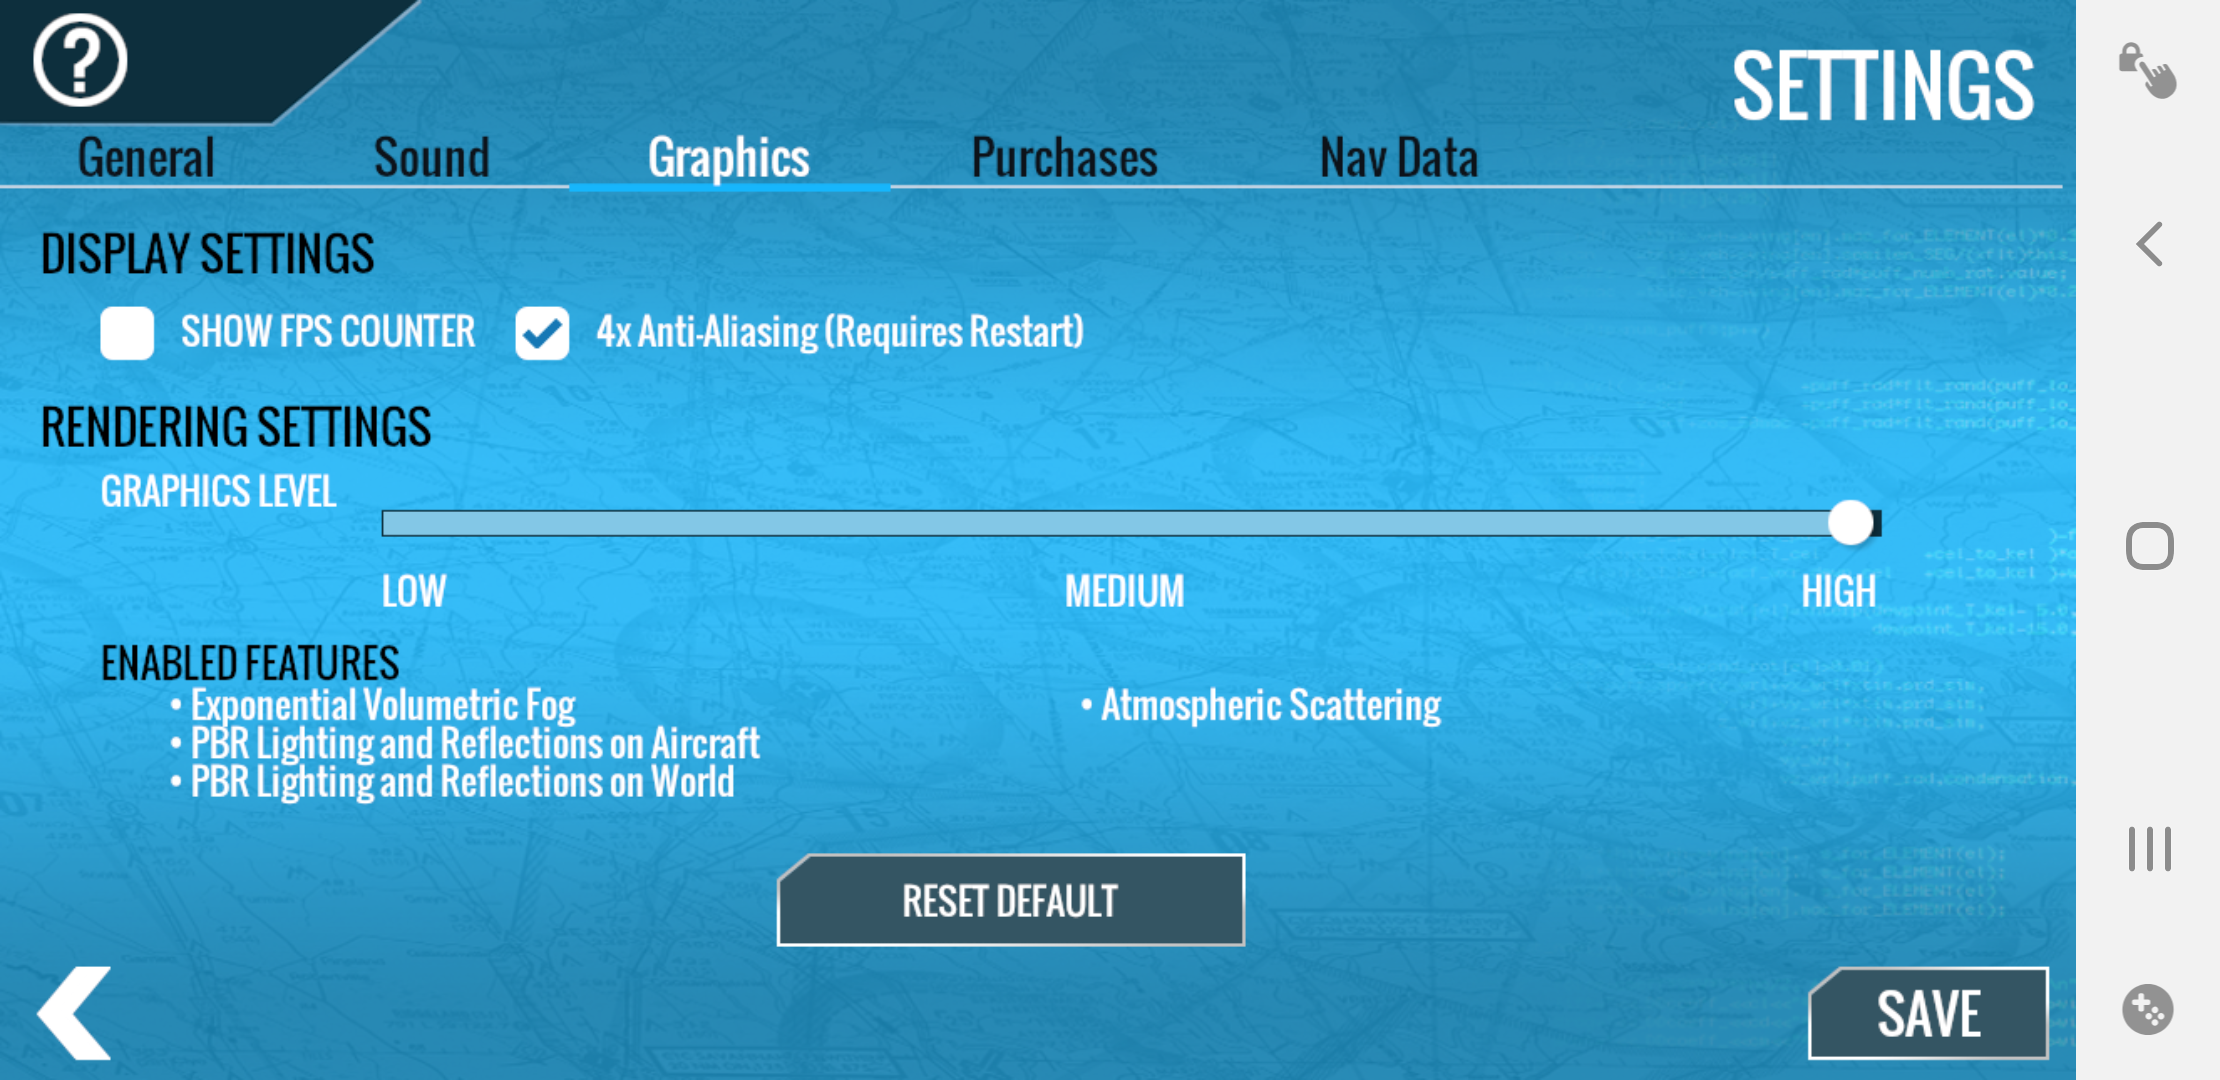
Figure 2: Graphics settings, showing Android-specific anti-aliasing toggle
Android devices have the additional option to toggle “4x Anti-Aliasing” (this setting is always on for iOS devices). It is set to off by default, but if your device has excellent performance and good hardware, you can re-enable it here. Note that the change only takes effect after fully restarting the app.
On the Purchases tab you can manage your subscription level. Tap “Manage Subscription” to see or change between the four subscription options. The “professional level” options on the left include access to complete global scenery as well as the entire fleet of aircraft. The “basic level” options on the right include only global scenery, and require separate, individual purchases for each aircraft. Either level can be purchased monthly or for an entire year at a reduced rate. Tap the “Apple Subscription Website” to cancel or modify your subscription through the iTunes store instead of within the app.
Another important function on the main Purchases tab is the “Restore Purchases” button. Tap it to restore a purchase receipt for any aircraft that were purchased on another device with the same Apple or Google Play ID, or if the app had to be re-installed.
Finally, on the Nav Data tab, tap “Connect to Navigraph” to download nav data. Free nav data is provided with the app, but is a year old. You can purchase a Navigraph subscription to automatically stay up to date with the latest nav data. Tap “Check for latest data” to download and install any nav data updates, then log in with your Navigraph account.
Tap “Save” to keep these settings and return to the home screen, or tap the white arrow in the bottom left corner to return to the home screen without making any changes.
Flying in X‑Plane Mobile
The app comes with the Cessna 172SP and the Cirrus Jet SF50 already unlocked, along with all tutorials and the challenges that use these two aircraft. A free test flight is available in Freeflight for all unowned aircraft–just tap the white plane icon labeled “Test Flight” in the bottom right corner. On the following screen you can choose to unlock the aircraft for 60 seconds, or 24 hours by sharing it on social media (if you are logged into your account in the device’s Settings).
To unlock unlimited flight time for aircraft, global scenery, and all challenges, you must first purchase a subscription. See the section Making In-App Purchases for more details.
For a hands-on tutorial on general controls in X‑Plane Mobile, check out the “X-Plane Basics” lesson in the Flight School section. You can also get started with the Cessna in the Takeoff and Landing tutorials. Otherwise, tap “Freeflight,” swipe to pick an aircraft, then tap the white plane icon in the bottom right corner to begin flying. See the Freeflight section for step by step instructions if you’d like to customize the flight scenario. For the purposes of the following walk through, we will be using the Cessna 172SP.
Basic Flight Controls
Every flight starts with the words “Hold the device comfortably and tap the screen to begin!” The device will calibrate the aircraft’s controls before every flight based on how the device is positioned during this message. Once the device is in a natural, comfortable position, tap the screen to be taken to the cockpit.
In general, aircraft in X‑Plane Mobile are controlled by moving the mobile device. (If you are using a controller, see Appendix: Game Controller Button Assignments instead.) Tilt the device forward to pitch the nose down, or tilt the device towards yourself to pitch the nose up and gain altitude. Tilting the device left or right will affect the roll. Drag a finger around the screen to look around. Spread apart two fingers to zoom in, pinch to zoom back out, and double tap the screen to return to the default camera angle.
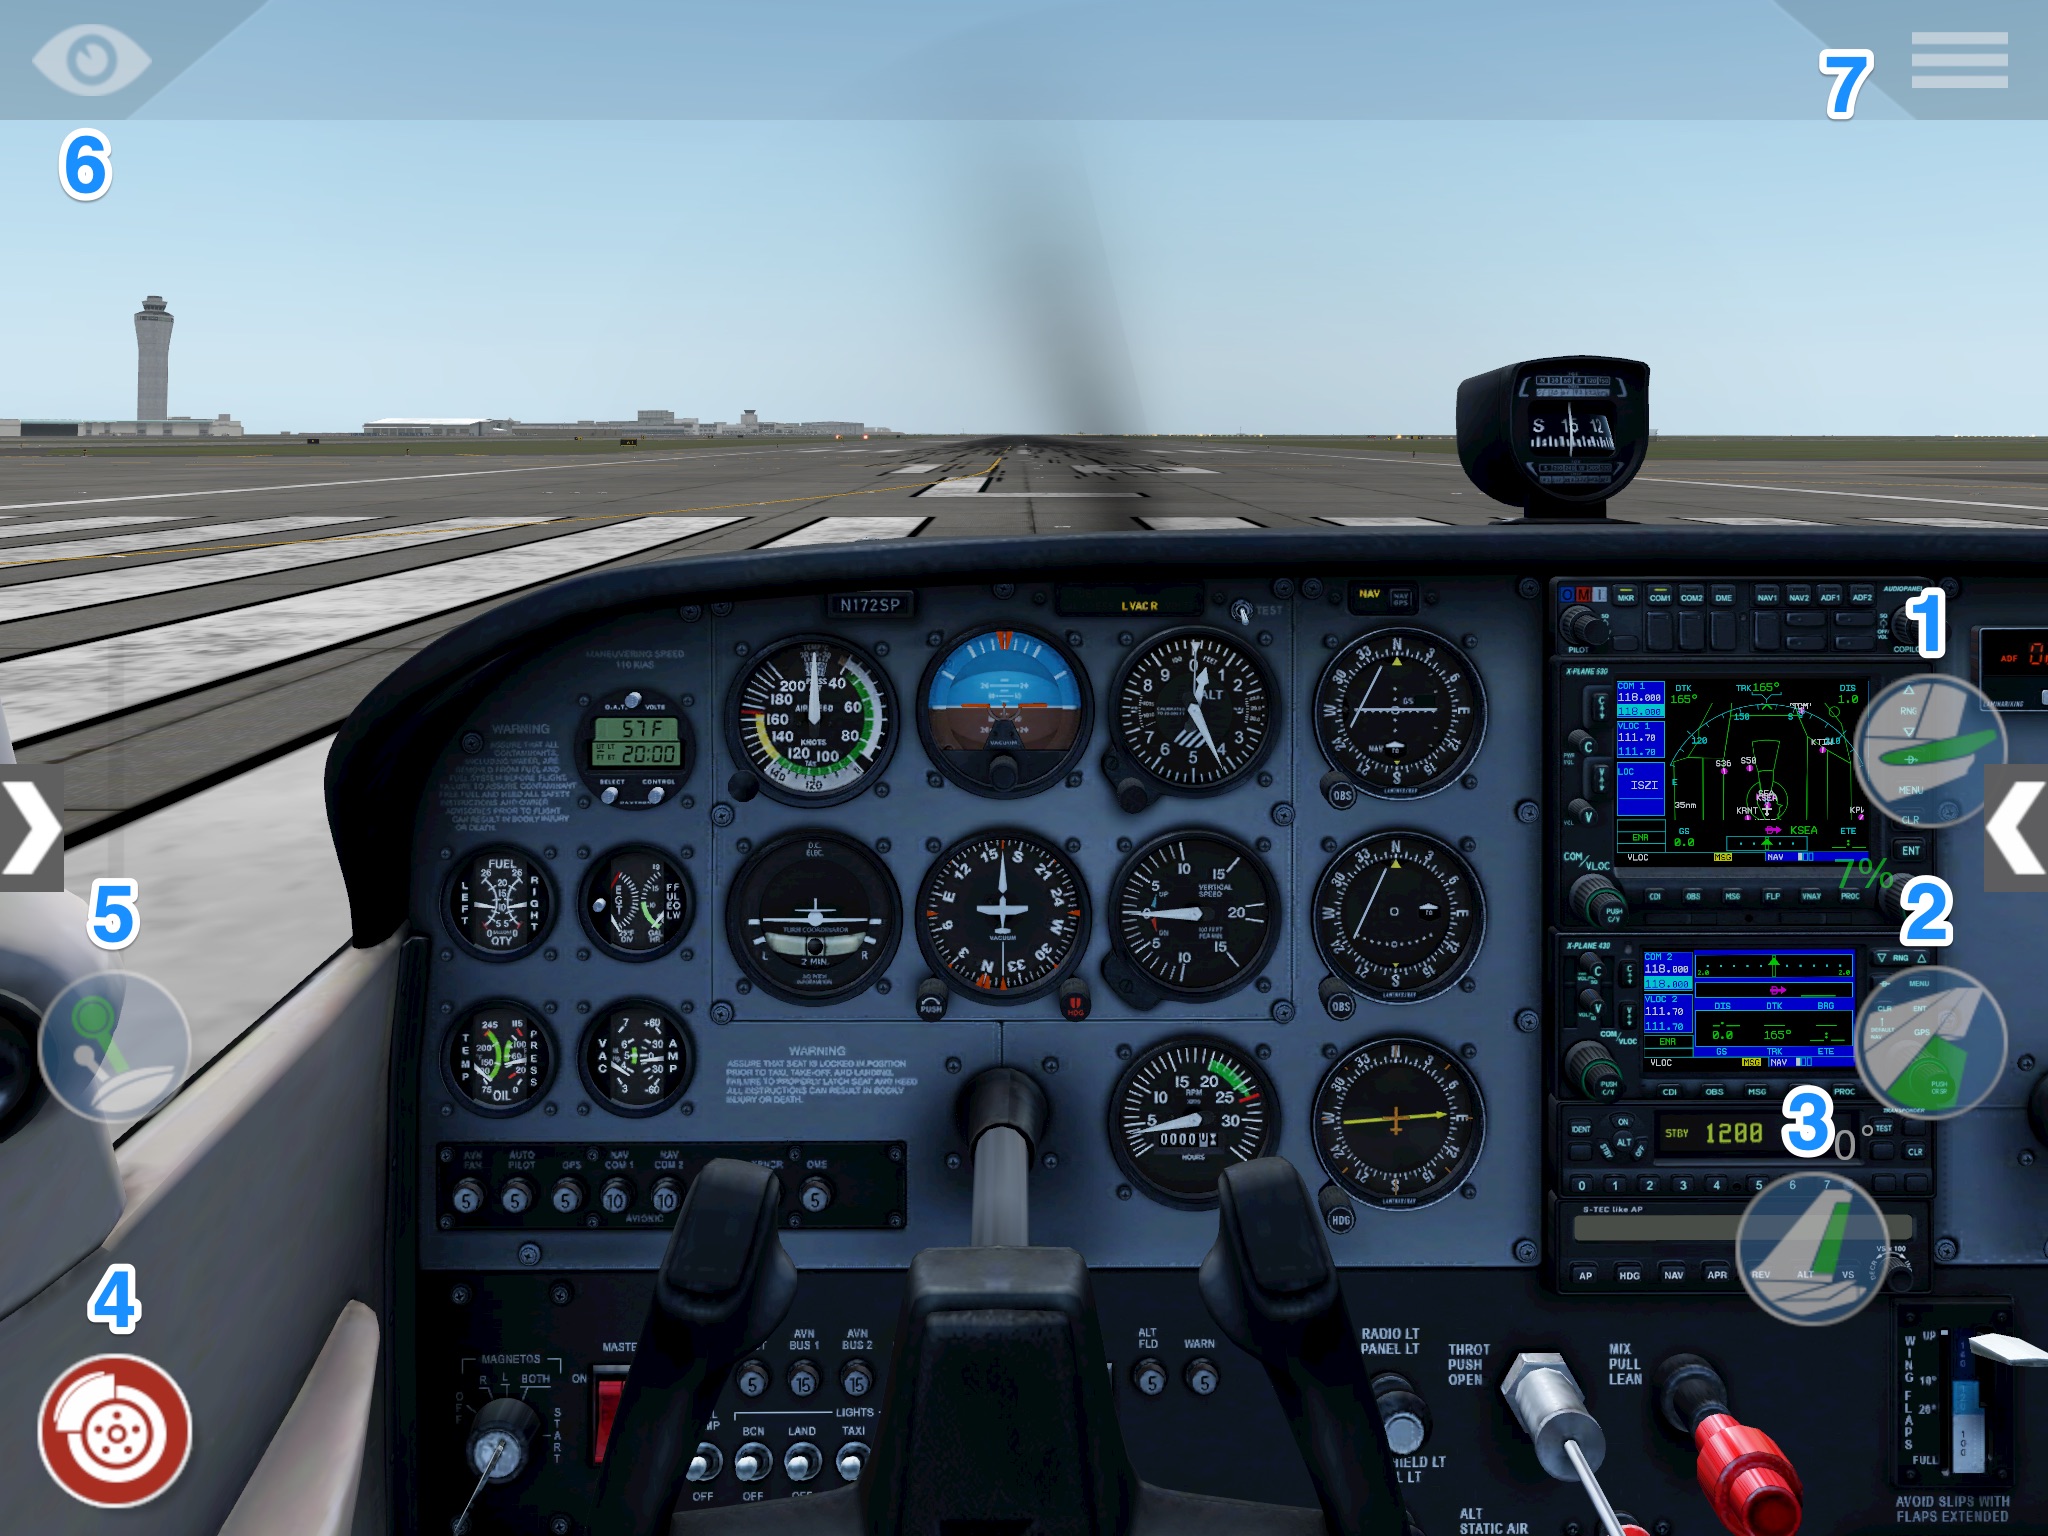
Figure 3: The Cessna 172 cockpit, with the control icons numbered
In the 3D cockpit, there are multiple ways to interact with the controls. Every aircraft includes at least a few controls that can be manipulated by using your fingers directly on them in the cockpit. Other aircraft, such as the C172 and 737–800, have extensive cockpit manipulators that are explained in the “Cockpit Manipulators” section below.
In addition to any manipulators in the cockpit, you can control the aircraft by using the pale, circular icons along the sides of the screen. (Note that other aircraft may have additional icons, such as missiles or landing gear, not shown or discussed here. Many are covered in Flight School tutorials, however.)
Now we will go over the icons as seen in Figure 4, starting in the bottom right corner and continuing clockwise, with the numbers in the image corresponding to their description in the following list.
The icon that shows part of a tail is pitch trim. Tap and drag up or down to adjust the elevator up or down, respectively.
The icon that shows part of a wing controls the flaps. Tap and drag up or down to adjust flaps up or down, respectively.
The icon showing part of a tail is the rudder. The rudder controls yaw, or moving the aircraft’s nose left or right. Tap and hold, then slide left or right to turn left or right, respectively.
The icon in the bottom left corner is the brakes. Tap to turn on or off. When the brakes are engaged, the icon is bright red.
The icon on the left side is the throttle. Tap and drag up or down to increase or decrease throttle.
The eye icon at the top left will change the view. Tap to cycle through the available views. For additional information, see the section Using the View Options.
The three bars in the corner are the menu. Tap this icon to pause the flight and bring up menu options (see Figure 8 in the section The In-Flight Menu Options).
Cockpit Manipulators
Some popular aircraft have extensive, full cockpit manipulators, such as the Cessna 172, Cirrus Jet SF50, Boeing 737–800, and MD-80, but all aircraft include a few manipulator controls (with more to come in future updates). Press and hold on the screen to access the “manipulator map” that will show the hit box for every manipulator in your current aircraft. (Note: The manipulator hotspot map can be turned off and on using the checkbox under the “Cockpit Preferences” section of the main settings screen.)
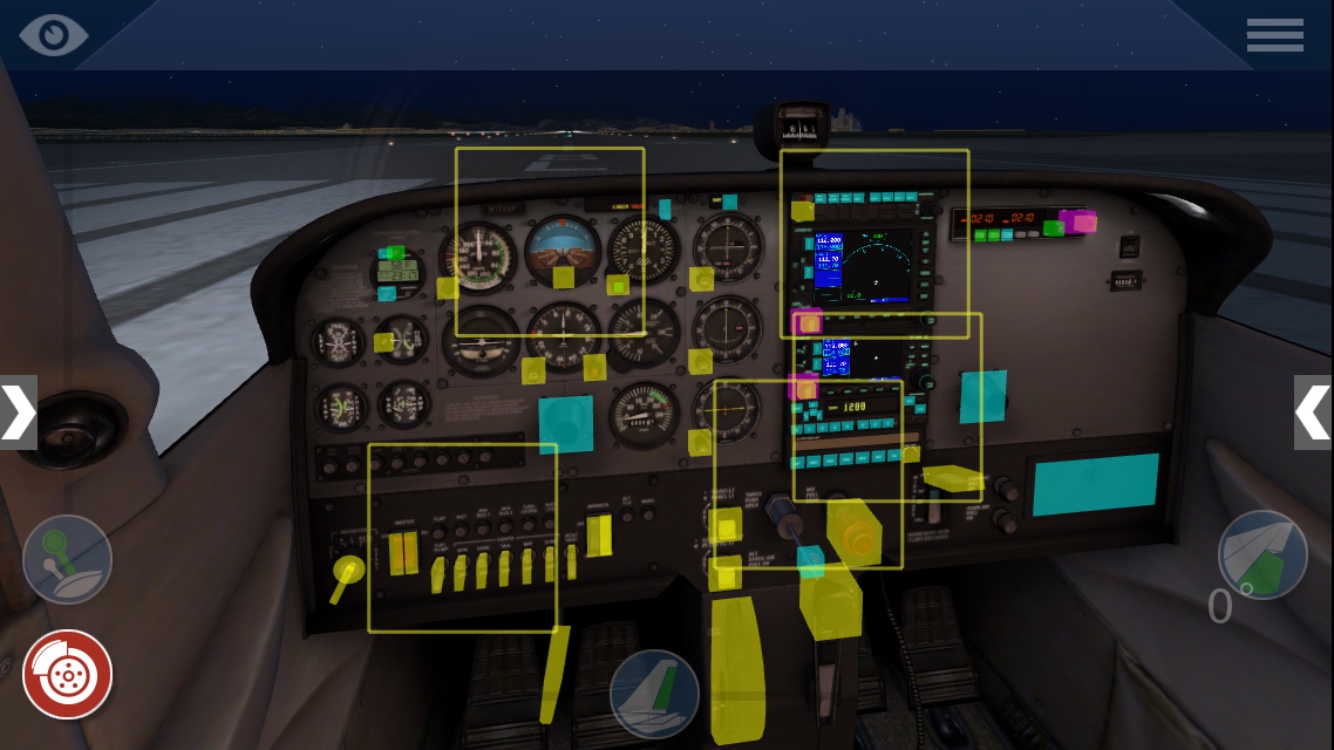
Figure 5: Manipulators in the Cessna 172
The different colors of manipulators respond to different types of gestures:
- Yellow manipulators respond to one finger drag
- Purple manipulators respond to two finger drag
- Green manipulators use a tap
- Cyan manipulators use a touch
Note that the difference between a “tap” and a “touch” gesture is that a “tap” has no duration. A “touch” allows you to use the manipulator while your finger is held against the screen. Or in other words, a “touch” is a “tap” + a hold.
The yellow boxes in the manipulator map are “quick looks.” Double tap near that area to zoom into a predefined closeup view of those controls. Double tap a second time to exit the quick look. You must exit one quick look and return to the default view before going into another quick look.
Starting aircraft from cold & dark
Aircraft that include full cockpit manipulators (such as the Cessna 172SP or MD-80) can be fully started up from “cold and dark,” or without the engines already running. This option is found on the aircraft’s settings screen, available only in Freeflight. Scroll to the aircraft you’d like to use, tap the gear icon for the settings, and tap the “Start with engines running” check box to toggle engines off and on. Note that this is a per-aircraft setting.
Using the Full GPS & FMS
X-Plane Mobile includes fully functioning versions of the X‑Plane G530, G430, and FMS in aircraft that have full cockpit manipulators. These devices are based on their real world counterparts and are all backed by real world Navigraphtm navigation data. They will allow you to enter flight plans, program approaches and departures, and more.
The Navigraphtm navigation data set encompasses the whole world and is therefore quite enormous. Mobile devices are limited in RAM (memory) and because of this limitation, the entire world cannot be loaded into the device at once. In the real world, even the G430/G530 have memory cards that are limited by region for a similar reason. Trying to add a waypoint to your route or get information about one that is not already loaded in memory will result in the device showing you “Invalid Entry” or “Not Found.”
X-Plane Mobile needs to be smart about how it manages the data in memory and because of this, there are a few caveats and deviations from the way the devices work in real life.
First, X‑Plane Mobile always tries to keep a radius of several hundred miles of data around the current location of the aircraft in memory. This is what populates the MAP view on the devices. The data that is loaded will change as the aircraft flies, loading new data as you move toward your destination and unloading old data as you fly away from an area. This happens automatically in the background. This means if you ever need to look up a nearby airport (NRST) or get information about any waypoint that is within this radius, the data will always be available even if you are not using the device for navigation and even if you have no route programmed at all.
Second, X‑Plane Mobile loads data along your programmed route. Waypoints along the way of your route will be accessible throughout the flight. So for example, if you programmed a route from Seattle, WA to New York, NY, while still on the ground at Seattle, you would be able to access data around the Chicago area because it’s along the line between WA and NY. You would not, however, be able to access Miami which is far south of your route.
Because of these limitations, routes need to be programmed by entering the destination airport first. This causes all of the data between the aircraft and the destination to be loaded which will then allow you to add points along the way. The alternative is to use the Globe route planner in the Freeflight screen to plan out your route ahead of time. Doing so will automatically program the route into the FMS/GPS and will have all of the data loaded automatically.
GPS Basics
The X‑Plane G430 & G530 have the same features and differ only in size. In aircraft with both, the G530 is used for NAV1 and COM1 frequencies, while the G430 is for NAV2 and COM2. The controls on left side adjust the VOR, localizer and communication frequencies, while the ones on the right control GPS functions. For a detailed look at all the functions of the simulated GPSes, check out the stand alone G530 & G430 manuals.
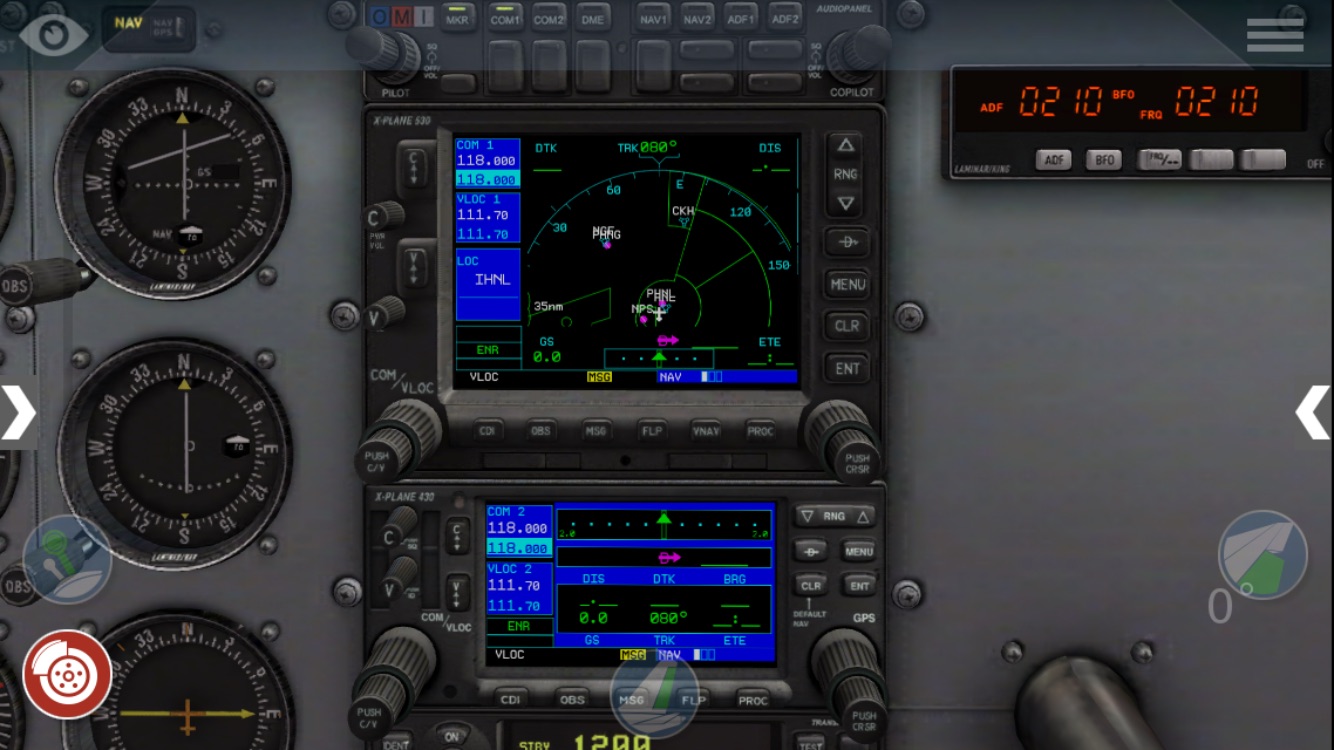
Figure 6: The G430 & G530 in the Cessna 172SP
To adjust the radio frequencies, tap the center of the large knob at the bottom to switch between controlling voice radio (COM or “C”) and navigation radio (“V”). The “active” channel is the top frequency in each dark blue box. When the bottom frequency is highlighted in a paler blue, you can use the inner and outer rotating knobs to change the frequency. Then use the vertical “swap” buttons (“C” up/down arrows or “V” up/down arrows) to make the standby frequency, which you just set, into the active frequency.
Read messages, create or edit a flight plan, and activate procedures by pressing the buttons at the bottom. Press the button again to return to the main navigational screen where you can zoom in and out in map view by using the “RNG” button, or change the level of detail with the “CLR” button. The large dial on the button moves through the categories navigational, waypoint or nearest (shortened to “NAV,” “WPT” and “NRST”), while the smaller dial moves through the sub screens of that type. Tap on the “PUSH CRSR” button to activate the cursor in applicable screens, then use the dials to change what text is selected. In general, the large dial moves between lines or options, while the smaller one is used to edit a line. Press “ENT” to keep changes or activate selections, and “CLR” or the CRSR button again to cancel.
To enter a GPS destination, press the “Direct to” button (the D with an arrow through it). The LCD will change to a data entry screen. Use two fingers to adjust the large, outer knob in the bottom right to pick the character position you want to change, and use one finger for the inner ring of the knob to scroll through the alphabet/numbers. For example, to pick the default airport KSEA as your destination, use the inner knob to scroll to “K”, use the outer knob to move the cursor to the next position, use the inner knob to scroll to “S”, and so on, then tap ENT twice to activate it. (Note that the X‑Plane GPS includes data for the whole world and can only recognize ICAO identifiers.)
After creating a flight plan, you can save it to load later by pressing the Menu button while in the active flight plan screen. You can also reverse the order of waypoints or delete the entire plan from this menu. To load a saved plan, use the small knob to go to the second screen of the Flight Plan category. Any .fms file that has been saved in the app can be selected from this list.
FMS Basics
An FMS, or Flight Management System, is a centralized computer system used in airliners, and other high-performance aircraft, to manage many of the aircraft systems, including (but not limited to) the flight plan. The X‑Plane FMS is modeled closely off of the system built by Collins and found in Boeing aircraft, such as the 737 available in X‑Plane Mobile.
Due to the immense complexity of a real-life Flight Management System, the version modeled in X‑Plane 11 is simplified, and does not support every capability. However, the functions necessary to program and execute a flight plan are present, including the use of published arrival and departure procedures (SIDs and STARs) and instrument approaches.
The Control Display Unit (CDU) is the interface located in the cockpit through which the Pilot interfaces with the Flight Management Computer (FMC). Its main components are the display, the scratch pad near the bottom of the display, the line select keys along the side of the display, and the key pad at the bottom, used to input text.
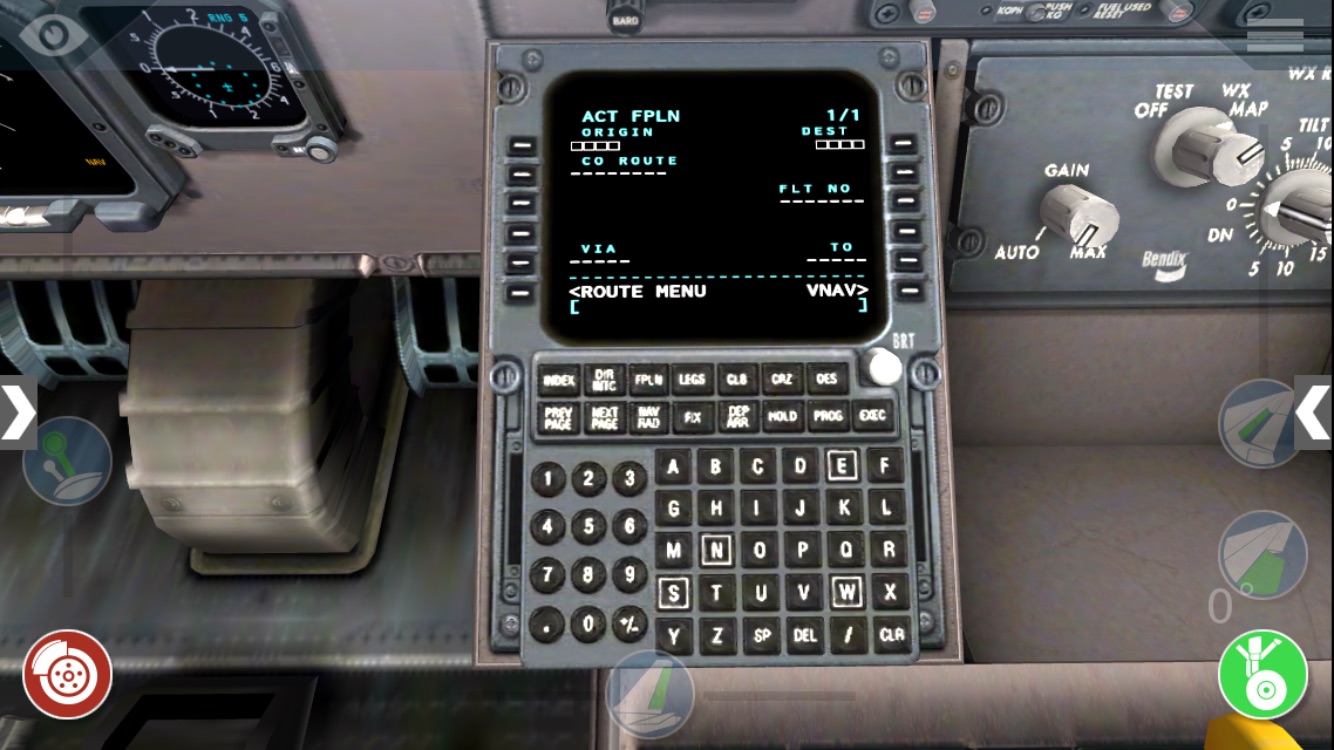
Figure 7: The CDU in the MD-80
In general, the process for entering data into the CDU is to use the key pad to enter your text into the scratch pad, then tap a line select key to transfer the text to the appropriate data field. When selecting from data stored in the CDU, such as departures, arrivals, fixes, and more, tap the line key next to the field you wish to input.
Note that in X‑Plane Mobile, device memory limitations restrict the range of airports which can be entered in the FMS destination field. Enter your full flight plane on the map screen, then use the “Pack Flight” option to work around this limitation and to prefill your full flight plan into the FMS.
For a full explanation of all the features of the X‑Plane FMS, including a flight plan walkthrough and some troubleshooting tips, see the full FMS Manual.
Pushback & Service Trucks
X-Plane Mobile 11.1 includes ground service vehicles and pushback trucks. You can request these services at your aircraft while parked at a ramp at some airports. Tap the truck and wrench icon next to the brake icon to open the truck services UI.
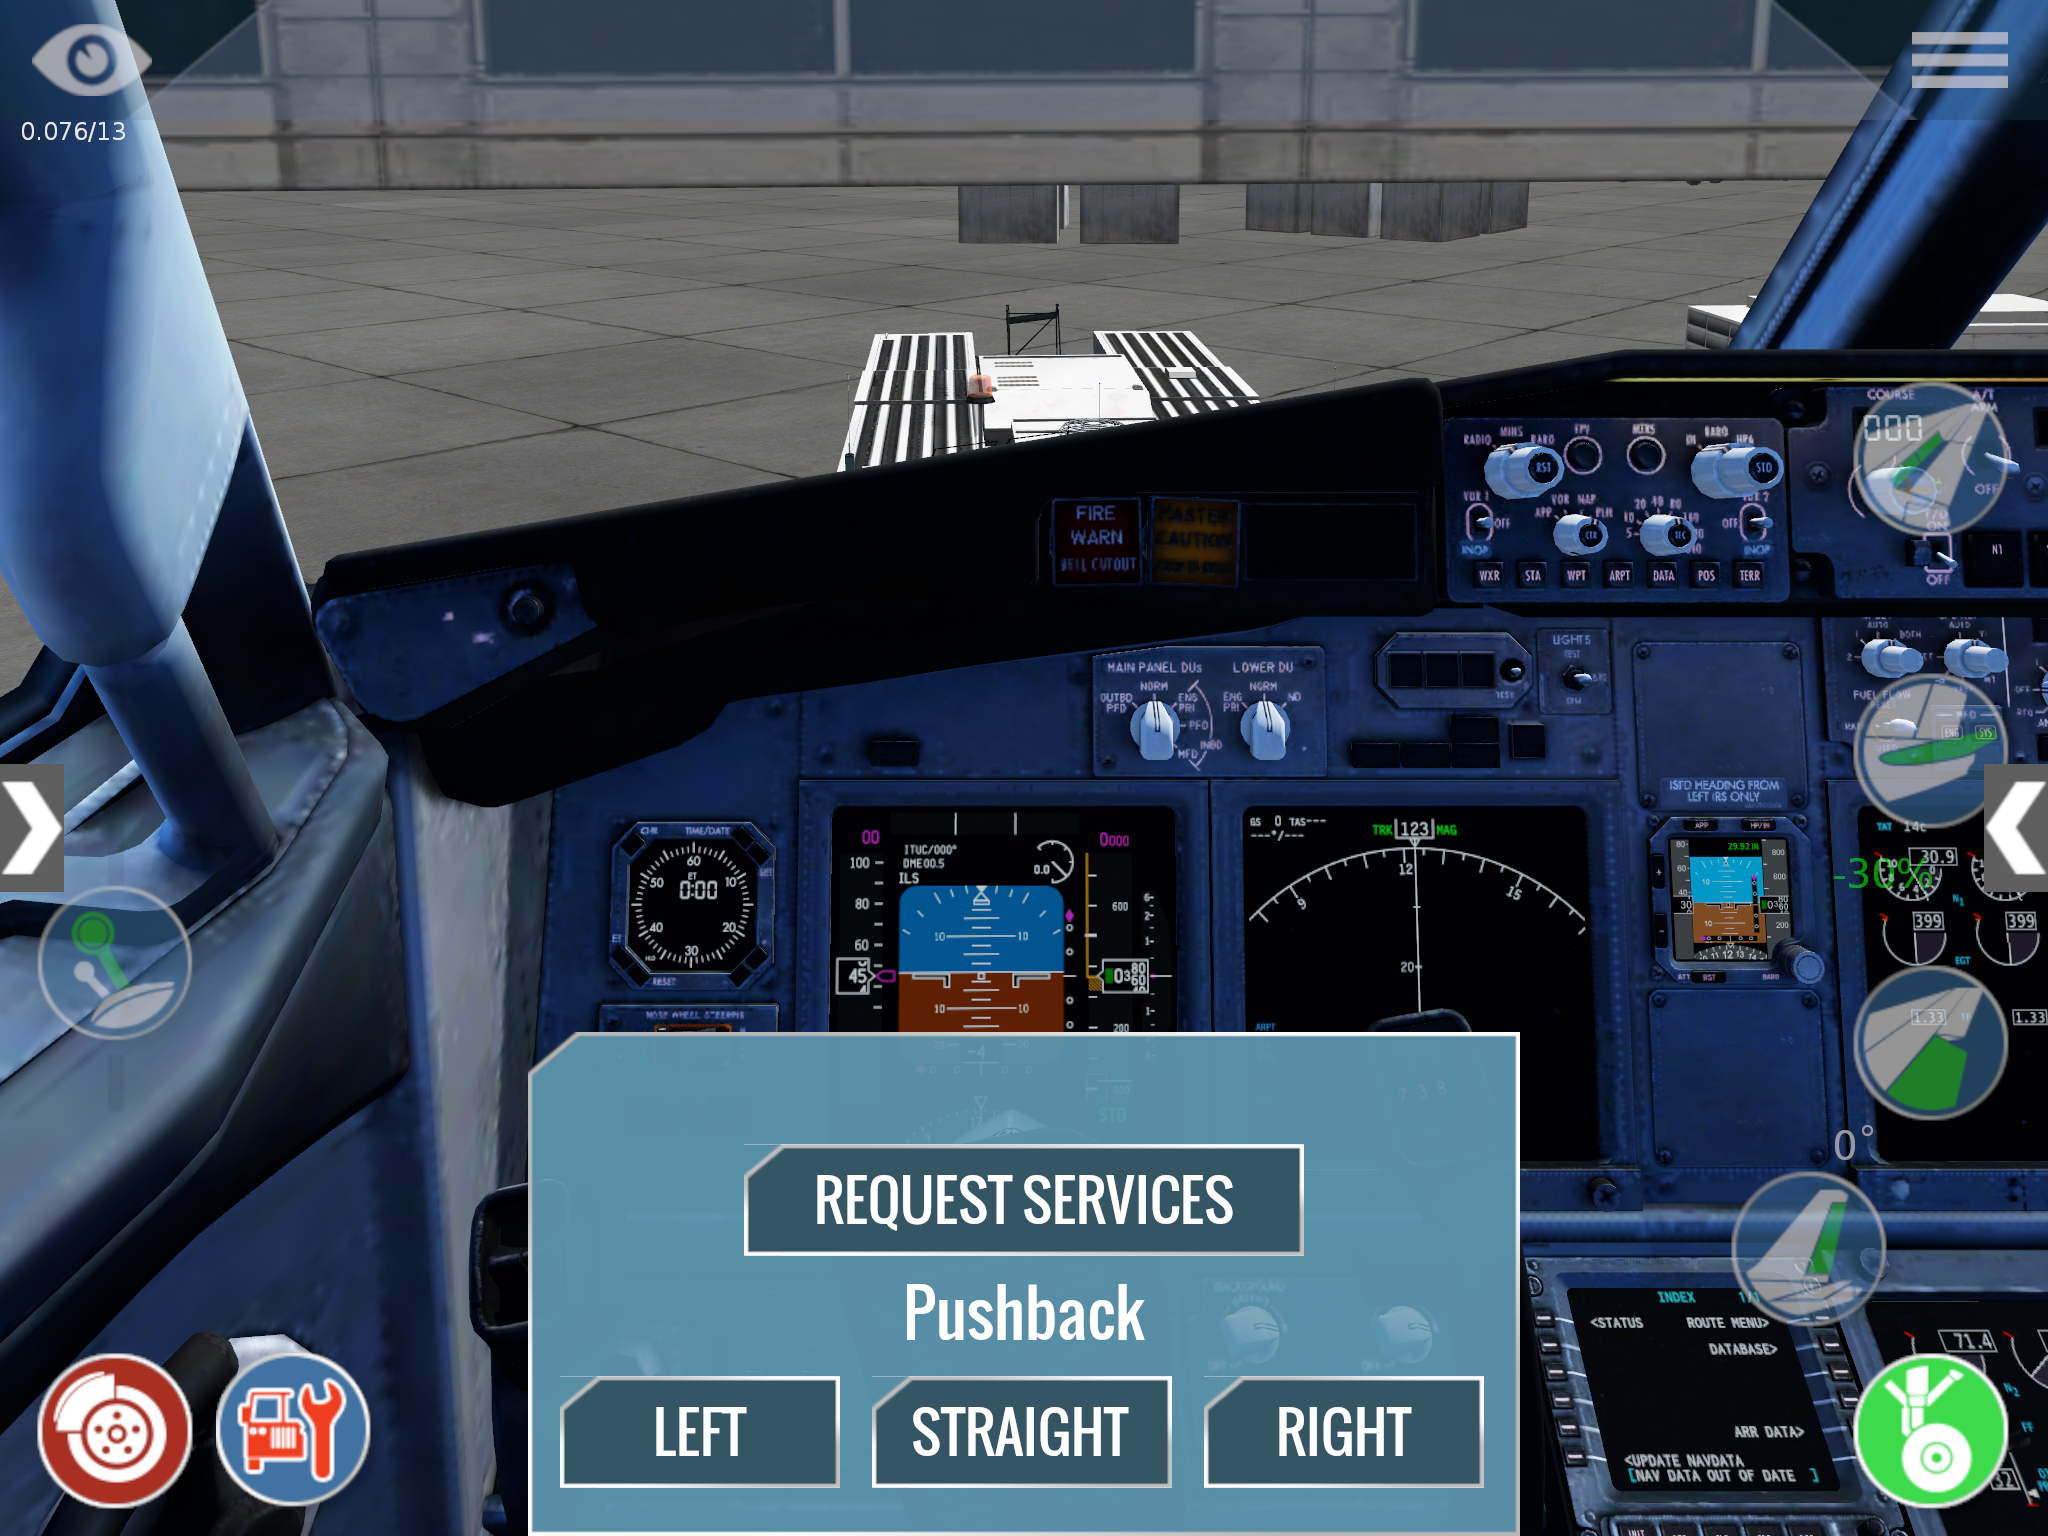
Figure 8: The push back and service truck options
Tap Request Services to call service trucks such as fuel, baggage, and food to your aircraft. Keep in mind there may be a short delay before they arrive as they are coming from various places around the airport.
Once the service trucks have finished, you can tap either of the Left, Straight, or Right pushback buttons to call the push cart to your aircraft. Again, you may see a small delay if it has to travel to your aircraft from somewhere else at the airport. Once you toggle your brakes off, it will give you the pushback in whichever direction you chose, and automatically disengage once the push is finished.
Note that these services are not necessarily available at all airports. Truck availability depends on whether or not these capabilities have been added in the underlying airport data. This can be changed by anyone willing to learn the open source scenery editing software WorldEditor (WED) and submit their changes to the Airport Scenery Gateway. See Appendix: Submitting Changes to Scenery for more information.
The Instrument Panel In-Depth
A few different panels are used in the aircraft in the application. Many of the general aviation aircraft, such as the Cessna 172, use a panel equipped with steam gauge flight instruments. More complex (and expensive) aircraft, such as those using jet engines, have an electronic flight instrument system, or EFIS, instead. An EFIS can be called a glass panel as well. All of the more specialized panels are based on some combination of these two types; understanding what each gauge and screen does will allow the user to understand any of the panels in the simulator.
The Steam Gauge Flight Instruments
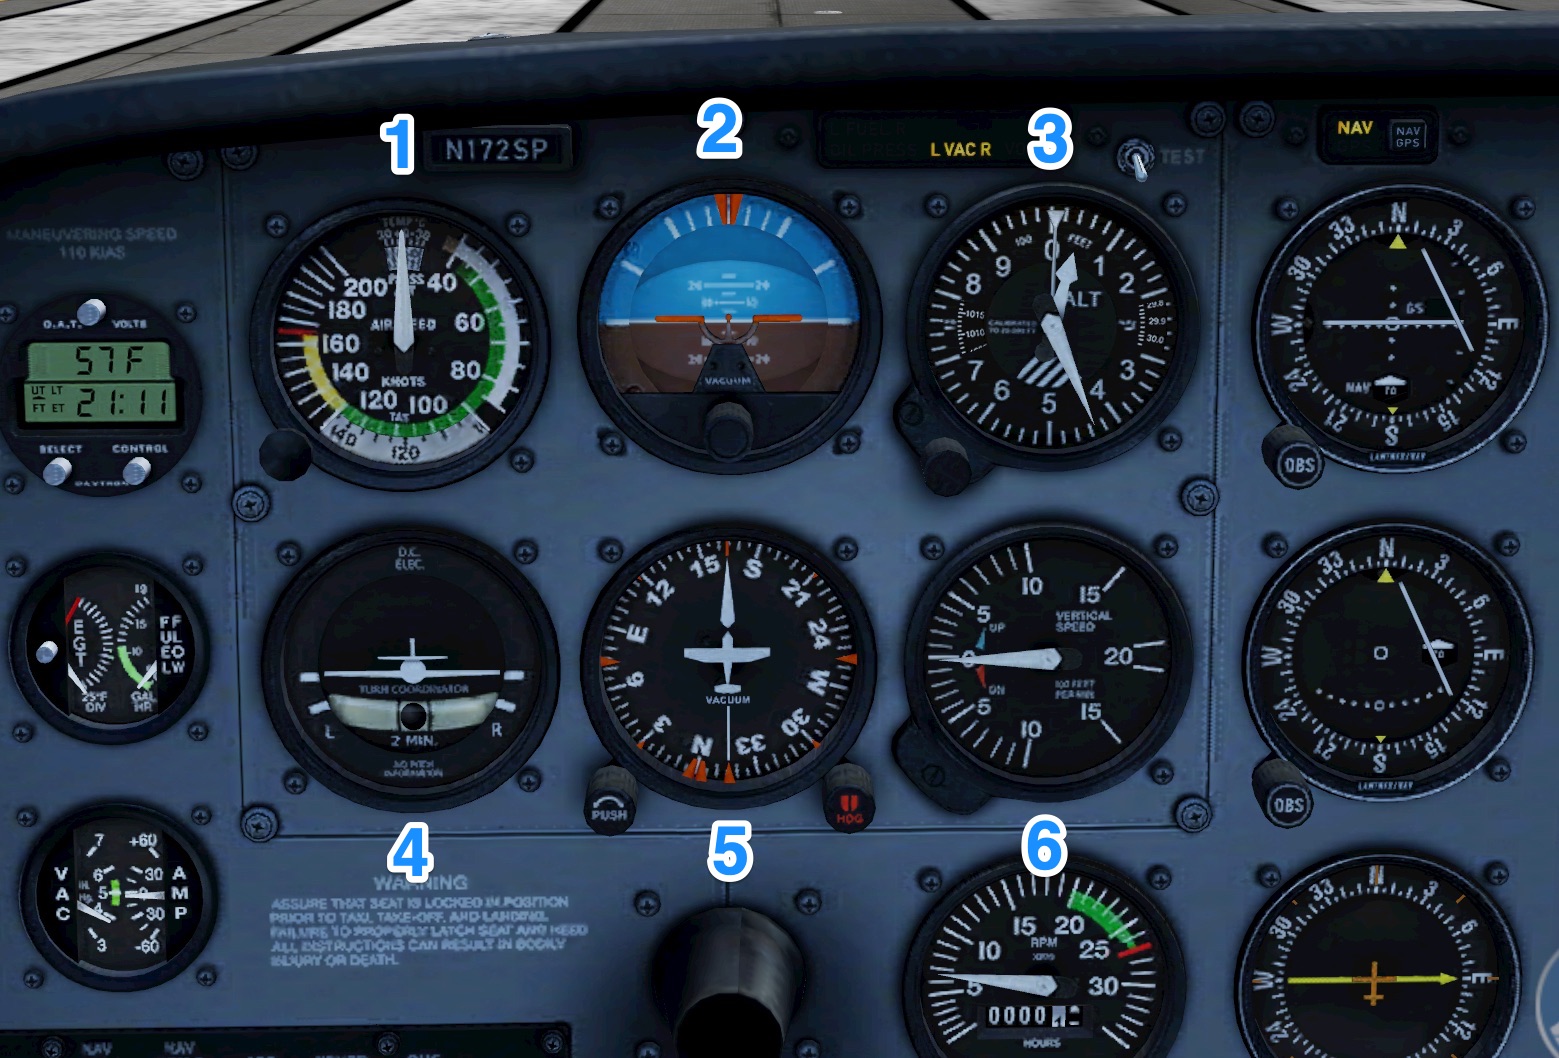
Figure 9: The steam gauge panel, with key instruments numbered and corresponding to descriptions below
The gauge numbered 1 in the image above is the airspeed indicator (ASI). In its simplest form, this is connected to nothing more than a spring which opposes the force of the air blowing in the front of a tube attached to the aircraft. The faster the airplane is moving the stronger the air pressure is that acts to oppose the spring and the larger the deflection of the needle from which the pilot reads the craft’s speed. There are a number of ways that this reading can be thrown off (most obviously by flying at an altitude where there is little to no air), so bear in mind that this is the indicated airspeed, not necessarily the true airspeed.
The instrument to the right of the ASI is the attitude indicator (AI), numbered 2 in Figure 9, which displays the aircraft’s position in space relative to the horizon. This is accomplished by fixing the case of the instrument to the aircraft and measuring the displacement of the case with reference to a fixed gyroscope inside. This instrument corresponds to the horizontal bars seen in the middle of the HUD view.
Next to the attitude indicator is the altimeter, numbered 3 in Figure 9 above. This displays the aircraft’s altitude (in feet above mean sea level) by measuring the expansion or contraction of a fixed amount of air acting on a set of springs. As the airplane climbs or descends, the relative air pressure outside the aircraft changes and the altimeter reports the difference between the outside air pressure and a reference, contained in a set of airtight bellows.
Item number 4 in Figure 9 is the turn coordinator. This measures the aircraft’s rate of turn. The instrument is only accurate when the turn is coordinated—that is, when the airplane is not skidding or slipping through the turn. A skid is the aeronautical equivalent to a car that is understeering, where the front wheels do not have enough traction to overcome the car’s momentum and the front of the car is thus plowing through the turn. In a car, this results in a turn radius that is larger than that commanded by the driver. A slip is a bit more difficult to imagine unless one is a pilot already. It results from an aircraft that is banked too steeply for the rate of turn selected. To correct the slip, all the pilot has to do is increase back pressure on the yoke, pulling the airplane “up” into a tighter turn, such that the turn rate is in equilibrium with the bank angle.
Next to the turn coordinator is a directional gyro (numbered 5 in Figure 9) indicating which direction the aircraft is traveling.
To the right of the directional gyro is the vertical speed indicator (labeled 6 in Figure 9), also called the vertical velocity indicator or variometer. This reports the aircraft’s climb or descent rate in feet per minute (fpm). Typically, non- pressurized airplanes will climb comfortably at about 700 fpm (if the plane is capable) and descend at about 500 fpm. Descent rates faster than this cause discomfort on the occupants which is felt in passengers' ears. Pressurized airplanes can climb and descend much more rapidly and still maintain the cabin rate of change at about these levels, since the cabin pressure is not related to the ambient altitude unless the pressurization system fails.
The Glass Cockpit Panel
The “glass cockpit” instrument panel—that is, those that use an electronic flight instrument system (or EFIS)—display the same information as the steam gauges in the previous section, with a few additions. In the image below, the left display panel is the primary flight display, while the right display panel serves as a moving map.
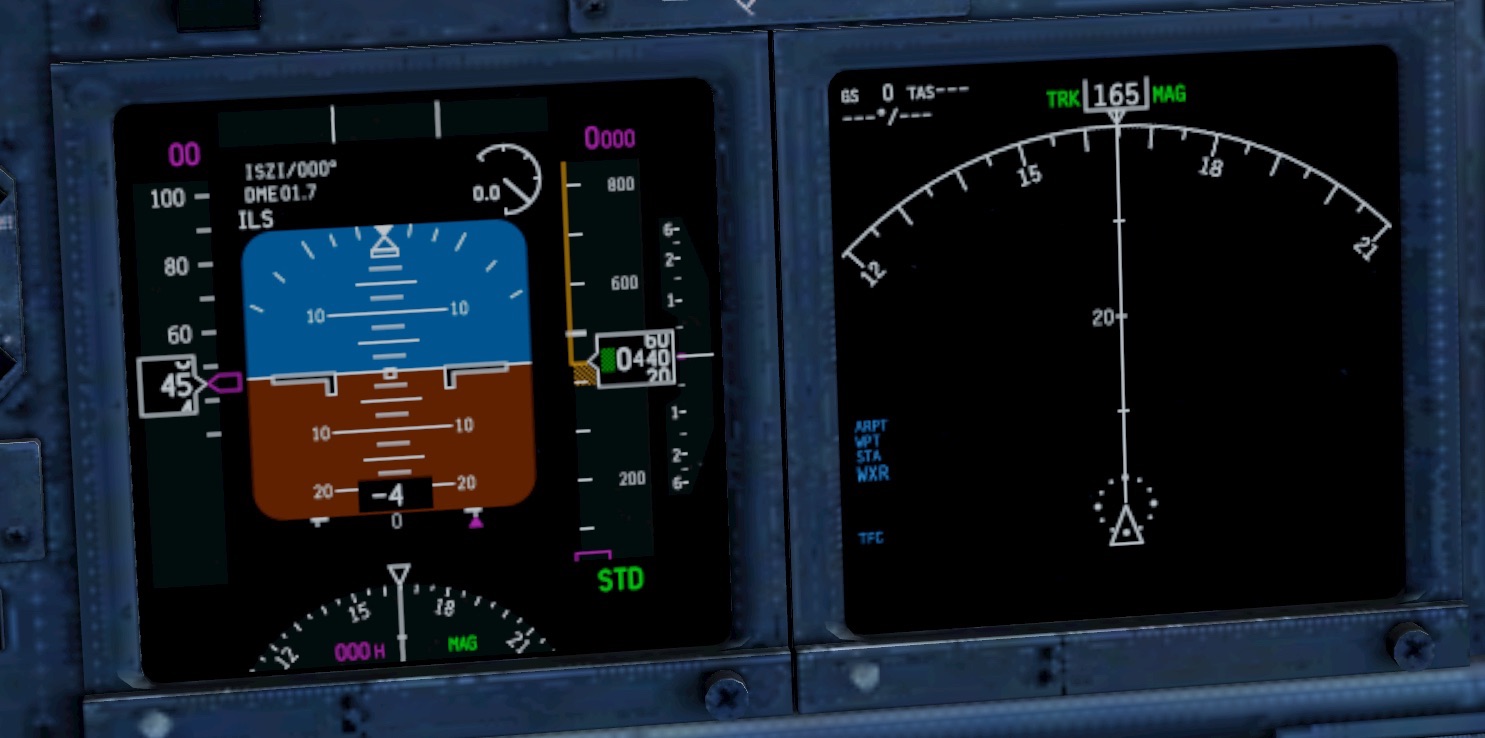
Figure 10: The glass, or EFIS, cockpit panel
The primary flight display in the EFIS combines the functions of a slew of navigation instruments into one display. Let’s look at this display closer.

Figure 10a: A close-up view of the EFIS display, with indicators numbered to correspond to descriptions below
The scrolling tape on the far left (labeled 1 in Figure 10a) is the airspeed indicator. Once again, this is the indicated airspeed, not necessarily the true airspeed. Directly below the scrolling tape is the craft’s speed relative to the speed of sound, shown just like in the HUD view.
In the center of the EFIS display is the attitude indicator (labeled 2 in Figure 10a). This shows the aircraft’s pitch and roll attitude in space relative to the horizon. As in the HUD view, there are lines above and below the representation of the aircraft that mark degrees of pitch.
The scrolling tape on the right (labeled 3 in Figure 10a) is the altimeter. This displays the airplane’s altitude in feet above mean sea level.
In the bottom of EFIS screen is a modified view of the horizontal situation indicator (or HSI), labeled 4 in Figure 10a. This is a combination of a directional gyro (DG) and the course deviation indicator (CDI).
Getting off the Ground
The following instructions are based on the Cessna 172 as it is included with the free app download. More complex aircraft (such as helicopters or commercial airliners) will operate differently. Check out Flight School within the app or online for a list of tutorials on operating the Cessna and many other aircraft, or see the section “Aircraft Takeoff Speeds” below.
Basic procedure for taking off is as follows:
Turn off the brakes.
Slide the throttle all the way up.
Tilt the device left and right to steer down the center of the runway.
When the aircraft reaches its takeoff velocity (around 55 knots for the Cessna), tilt the device back toward you, thus pulling back on the craft’s flight controls and rotating (or lifting off the ground).
Level the plane off once it is a few feet above the ground so that it can build up speed. This will act as a cushion to prevent it from stalling once it begins to climb in earnest.
Climb at around a 10 degree incline (more powerful craft can handle higher climb rates) at full throttle until the desired altitude is reached.
Note that once the power is set at full, the performance of the plane (in terms of its climb rate and airspeed) is controlled by pitching the nose up and down. If its nose is pitched too high up, its speed will drop until it stalls. This can be thought of as being similar to a car trying to go up a hill—an excessively steep hill will cause the car to go very slowly and its engine to overheat.
Aircraft Takeoff Speeds
The following table lists the takeoff speeds for some of the aircraft available in X‑Plane Mobile. For many of the aircraft, having 1/3 flaps pulled in will provide additional lift to help get off the ground. In addition, it is a good idea to add five to ten knots to the following numbers as a “speed cushion” before pulling the aircraft’s nose off the ground during takeoff (called “rotating”).
| Aircraft | Approx. Take Off Speed (knots) |
|---|---|
| Cessna 172 | 55 |
| Piper Super Cub | 50 |
| Baron B58 | 90 |
| Piaggio Avanti | 95 |
| King Air C90 | 90 |
| Airbus A320 | 170 |
| A-10 Thunderbolt II | 120 |
| F-22 Raptor | 115 |
| F-4 Phantom | 175 |
For more information on the aircraft available in the app, check their individual pages listed on the Mobile Aircraft page on X-Plane.com.
The In-Flight Menu Options

Figure 11: The in-flight menu options
During a flight, tap the three bar icon in the top right corner to pause the simulator and access the in-flight menu as seen in Figure 11.
Settings: Tap this to be taken to the settings screen to adjust sound volume or calibration. Adjust how the aircraft handles at any point during a flight by going into this screen and tapping the “Recalibrate” button.
Flight Model: Tap this to show the actual work X‑Plane is doing behind the scenes. Only visible in an external view, the little green lines coming off the plane are a visual representation of the forces that X‑Plane is calculating for each piece of the airplane. Try maneuvering the plane around a good bit to see the little green bars move in real time. Watch what happens as you add and decrease power, extend and retract the flaps, or slow to a stall, for example.
Modify Flight: Tap this to modify the flight conditions. Similar to the initial Freeflight screen, weather, time of day & failures can be adjusted here. Tap the plane icon in the bottom right corner to return to the flight. Note this option is not available in tutorials or challenges.
Replay: X‑Plane has been recording the flight. Tap this option to view a video of the recent portion of the flight. Note this option is not available in Tutorials or Challenges.
During replay you can jump back in 5 second increments, pause, or play the recording by using the buttons at the bottom of the screen. Drag your finger along the bar to the left of the buttons to scrub the video forward or backwards. Use the eye in the top left corner to change your view, or tap the X to go back to the previous screen.
Quit: Tap this button to return to the previous Freeflight, Tutorial, or Challenge screen.
Using the View Options
Tapping the eye icon in the top left corner of the screen during any flight will cycle through the view options explained in detail below.
Cockpit View
This is the default view at the start of every flight, and features the aircraft’s interior. The instrument panel is prominent and takes up much of the screen space. Both steam gauge instruments and electronic flight instrument systems (EFIS) are featured in the simulator.
Heads-Up Display View
The head-up display, or HUD, allows the user to see a great deal of information regarding the aircraft’s operation without sacrificing the view of the outside world. Figure 12 shows a close up of the ticker tapes that characterize this view, with colored boxes around notable information displayed.
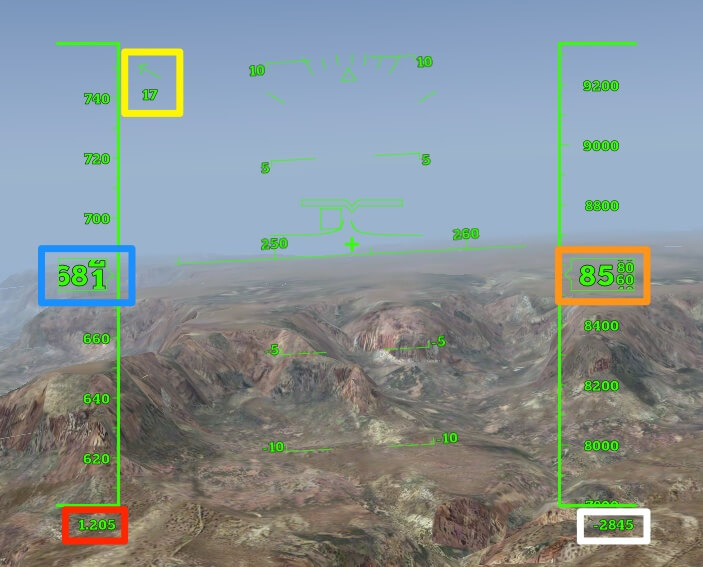
Figure 12: The HUD Display, with colored boxes highlighting important features
The ticking tape on the left side of the screen scrolls with the craft’s airspeed, and the number in the box (highlighted in blue in Figure 12) displays the craft’s actual airspeed in knots. For instance, in Figure 12, the craft is moving at 681 knots.
Directly beneath the ticking airspeed indicator is the aircraft’s speed relative to the speed of sound (highlighted in red in Figure 12). For instance, in Figure 12, the craft was moving at 1.2 Mach.
To the right of the airspeed indicator is the indicator for wind speed and direction (highlighted in yellow in Figure 12). The arrow points in the direction that the wind is moving, and the number beneath it displays the wind speed in miles per hour. For instance, in Figure 12, the wind was moving against the aircraft at 17 miles per hour.
The ticking tape on the right side of the screen scrolls the craft’s altitude, and the number in the box (highlighted in orange in Figure 12) displays the craft’s actual altitude in feet above mean sea level. For instance, in Figure 12, the craft was at 8,570 feet above sea level. The number directly below the altitude tape (highlighted in white in Figure 12) is the craft’s climb rate in feet per minute. For example, in Figure 12, the craft was descending at a rate of 2,845 feet per minute, so the number displayed was -2,845.
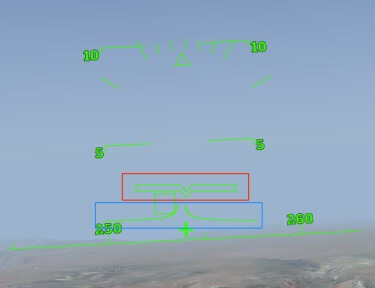
Figure 13: The center of the HUD Display, with colored boxes highlighting important features
Figure 13 shows a close up of the center of the screen where there are two horizontal bars. The V-shaped bar (highlighted in red in [Figure 1338) indicates the aircraft’s attitude—that is, the combination of its pitch and roll. The curved-line bar with a square near the center of it (highlighted in blue in Figure 13) is called the flight path indicator. It represents where the plane is actually flying, rather than where it is pointed. For instance, when the craft is taken into a 90 degree stall, the attitude indicator (the V-shaped bar) will stay momentarily at the 90 degree mark even as the flight path indicator drops rapidly. This is due to the fact that the aircraft’s vertical velocity slows to zero, then becomes negative, while its nose is still pointing up. Only after the craft falls a bit will its nose be pushed down.
Surrounding those bars are lines marking degrees of pitch. For instance, in Figure 13, the aircraft was pitched up about 3 degrees (indicated by the V-shaped bar), but it was actually moving up at around 1 degrees (indicated by the curved lines with the square near the middle). Its wings were banked ever-so-slightly to the right.
Note that the craft will hold a constant altitude (that is, it will have a climb rate of zero) when the center of the velocity vector’s circle is at the zero degree mark.
Finally, in the center of the screen is also a directional gyro. The line with a plus symbol on it, shown in Figure 13, directly under the blue box, shows which direction the aircraft’s nose is pointing. In this example, the nose is pointing about 255 degrees, or approximately WSW.
External Views
Ride-Along View
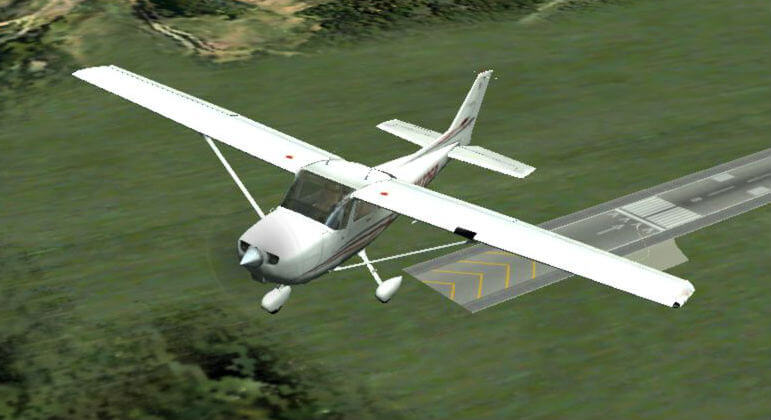
Figure 14: The external view of the Cessna 172
The image above shows the standard external view. In this view, you can drag your finger around on the screen to adjust the viewing angle. To zoom out, put two fingers down far apart on the screen and drag them closer together. To zoom in, put two fingers on the screen close together and drag them apart. This is a nice way of controlling the view that is just not possible with a mouse pointer, since the simulator takes input from both fingers at once.
Hold at Location View
When you cycle through to this view, the simulator fixes the camera’s location some distance in front of your craft’s current position (it may even be difficult to see your craft at first). As the aircraft passes the location and continues on its way, the camera will turn to follow its path off into the distance. As you can imagine, it is very difficult to control the aircraft from this view, so using the autopilot is recommended.
Wing View
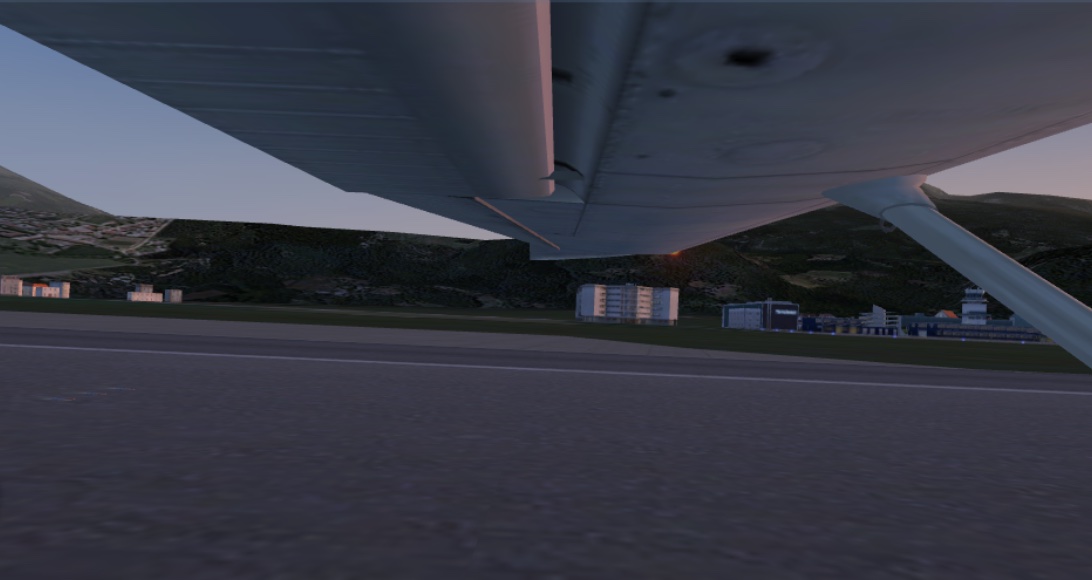
Figure 15: Wing view of the Cessna 172
This view is characterized by a fixed camera view right above or below the left wing of the aircraft.
Chase View
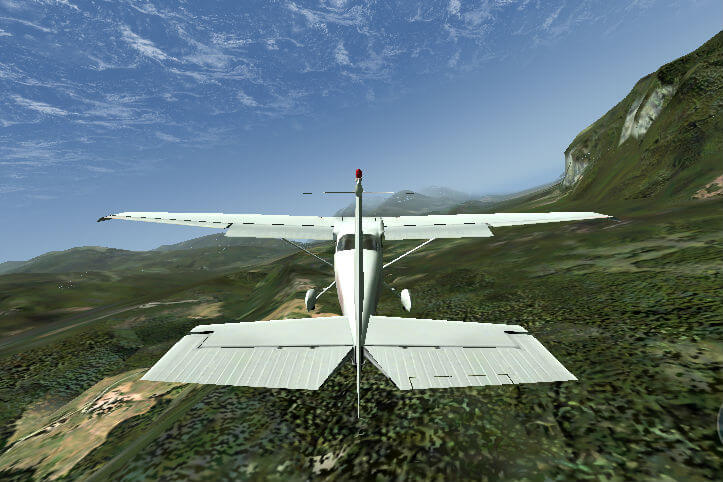
Figure 16: The chase view of the Cessna 172
This view, as shown in Figure 16, is characterized by the distortion of the aircraft and scenery. The camera angle is locked to the tail of the aircraft, and can only be zoomed in or out.
Missile View
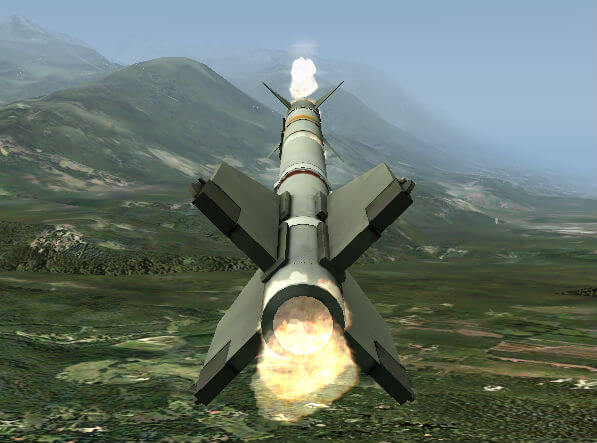
Figure 17: Following released ammunition in missile view
Missile view is only available in aircraft equipped with ammunition, like the F-22 Raptor. Select this view to follow released missiles or bombs as they make contact with their target.
Autopilot
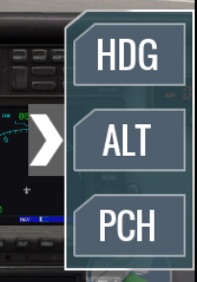
Figure 18: The autopilot buttons
Drag from the right side of the screen to pull out the autopilot controls drawer, as seen above in Figure 18. Tap for heading mode, altitude mode, and pitch mode respectively.
Turn on heading mode to keep the plane going the same direction it’s currently headed. It will do this by rolling the aircraft left and right. Turn on pitch mode to hold the plane’s nose at the current pitch altitude. For example, tapping “PCH” while the plane has its nose pitched up 10 degrees will have the autopilot hold this ten degree up attitude. Use altitude mode to maintain the current altitude. Using a combination of modes, such as heading mode with altitude mode, will yield the best results for steady, hands-free flight.
Solo Flight Options
There are three options for solo flight in the simulator, each accessed from the home screen. They are: Flight School (a great place to start for new users), Challenges, and Freeflight.
Flight School
Tap the “Flight School” button from the home screen to access tutorials. Here you can learn the basics of flying in the X‑Plane Mobile app. All tutorials are unlocked as part of the free download.
Swipe left and right or tap the dark arrows near the sides of the screen to scroll through the available tutorials. Tap the photo in the upper right hand corner of the screen to start it, or tap the white arrow in the bottom left corner to return to the app home screen.
During the tutorial, messages will pop up on the right side of the screen from the digital flight instructor to guide you through the lesson, point out important features, and give tips.
Challenges
Access flight scenarios by tapping “Challenges” from the initial home screen. Just like in the Flight School, challenges for the Cessna 172 and any other purchased aircraft are always unlocked. You can unlock other challenges (and thus the aircraft) from here by tapping the image, then “Buy,” and entering your Apple ID or Google Play password. Confirm your purchase to continue (or see the section Making In-App Purchases). All aircraft and their challenges are also unlocked if a “Professional” level subscription is purchased.
General Aviation challenges feature aircraft such as the Piper Super Cub, the Cessna 172 or the Piaggio Avanti, while Commercial Aviation challenges use large passenger jets like the Airbus A320. Racing and combat challenges are also available.
Swipe left or right, or tap the dark arrows near the sides of the screen, to scroll through the different categories. Tap the photo in the upper right corner to see the specific challenges within a category, or tap the white arrow in the bottom left corner to go back to the app home screen.
Challenges can range from emergency situations to tricky photo ops, with many options in between. Again, swipe left and right or use the arrows to see what challenges are available.
Each page has a short description of what you’ll be facing and how hard it will be, with 5 being most difficult. If you are logged into Game Center or Google Play Game Services and have tried the challenge before, your highest score will also be listed. If you beat it with a score of 80% or higher, you will receive a “Passed” stamp on the photo. Tap the image in the right corner to start the challenge, or the white arrow in the bottom corner to return to the previous screen.
Report Card
When you finish a challenge or tutorial, you will see a report card that shows how well you performed. Tap the white arrow to the left of the category to see what factors determined the score. See how you did in comparison to the global high score at the bottom.
You can also share your results on social media by tapping the icons in the top right corner. Tap the “f” to post to your Facebook account, while the bird icon will post to a Twitter account (Note: you may first need to be logged into your social media account through the device’s Settings screen). If you would like to view a video of your flight, tap the camera icon in the top left corner. Tap “Quit” to return to the challenge or tutorial summary screen or “Retry” to fly the same thing again.
Freeflight
Tap the “Freeflight” button from the opening screen to set up a custom flight scenario. Figure 19 shows the main options screen.
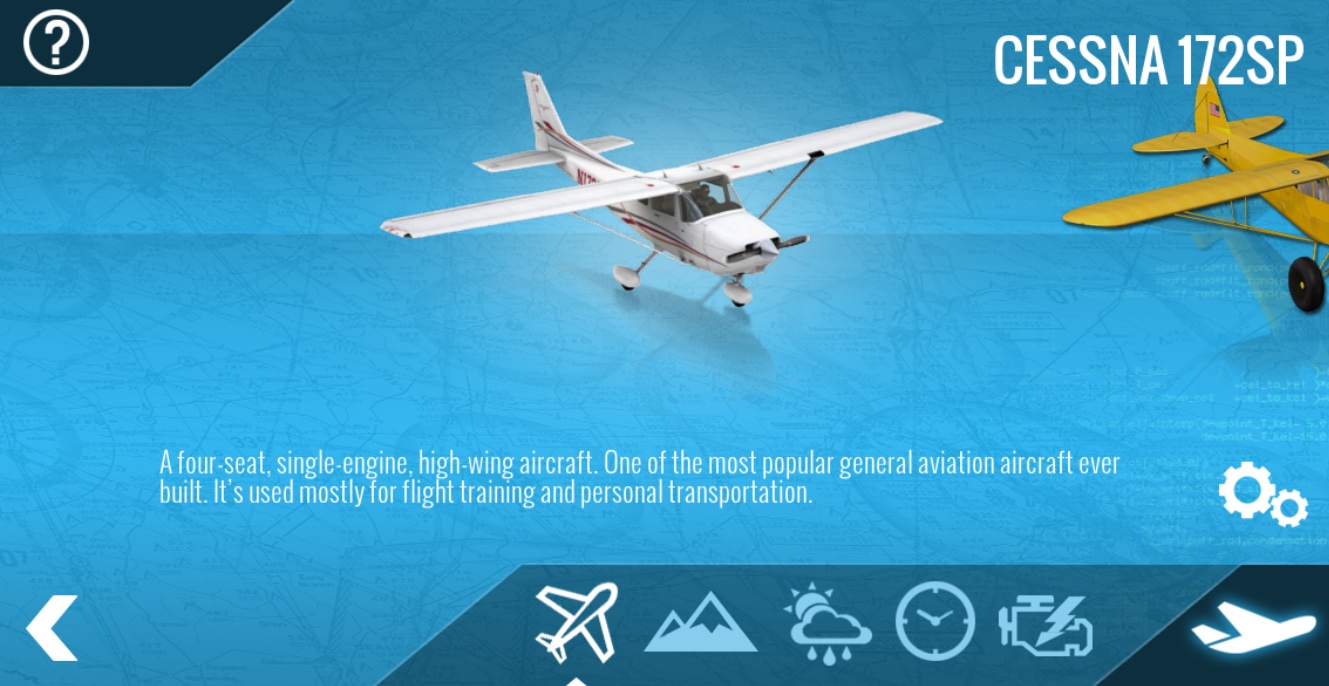
Figure 19: The first screen in Freeflight
If an aircraft has not yet been purchased, it will have a lock icon next to a green price box. A free test flight is available for any aircraft, but they must be purchased to unlock unlimited flight time and any related challenges. You can purchase an individual aircraft, or purchase one of the Professional level subscriptions to unlock all aircraft. (See the section Making In-App Purchases for instructions.) Tap the white plane icon labeled “Test Flight” in the bottom right corner, and on the following screen you can choose to unlock the aircraft for 60 seconds, or 24 hours by sharing it on social media (if you are logged into your social media account in the device’s Settings).
Swipe your finger left or right on the screen to scroll through the available aircraft. Tap the white plane icon in the bottom right corner to fly with your chosen aircraft immediately, or tap any of the icons along the bottom of the screen to customize the location, weather, time of day, and optional equipment failures. Tap the two gears in the bottom right corner to change settings for the chosen aircraft’s weight and center of gravity, or to change whether the engines are running or off. X‑Plane will use these settings for all future flights until they are changed, with the exception of the engines, which is set per aircraft.
Changing the Freeflight Scenario
To customize your flight’s weather, location, and more, tap the icons along the bottom of the Freeflight screen. Once you’ve made your changes, tap the white plane icon to start your flight.
- Mountain icon: Pick and plan your flight route
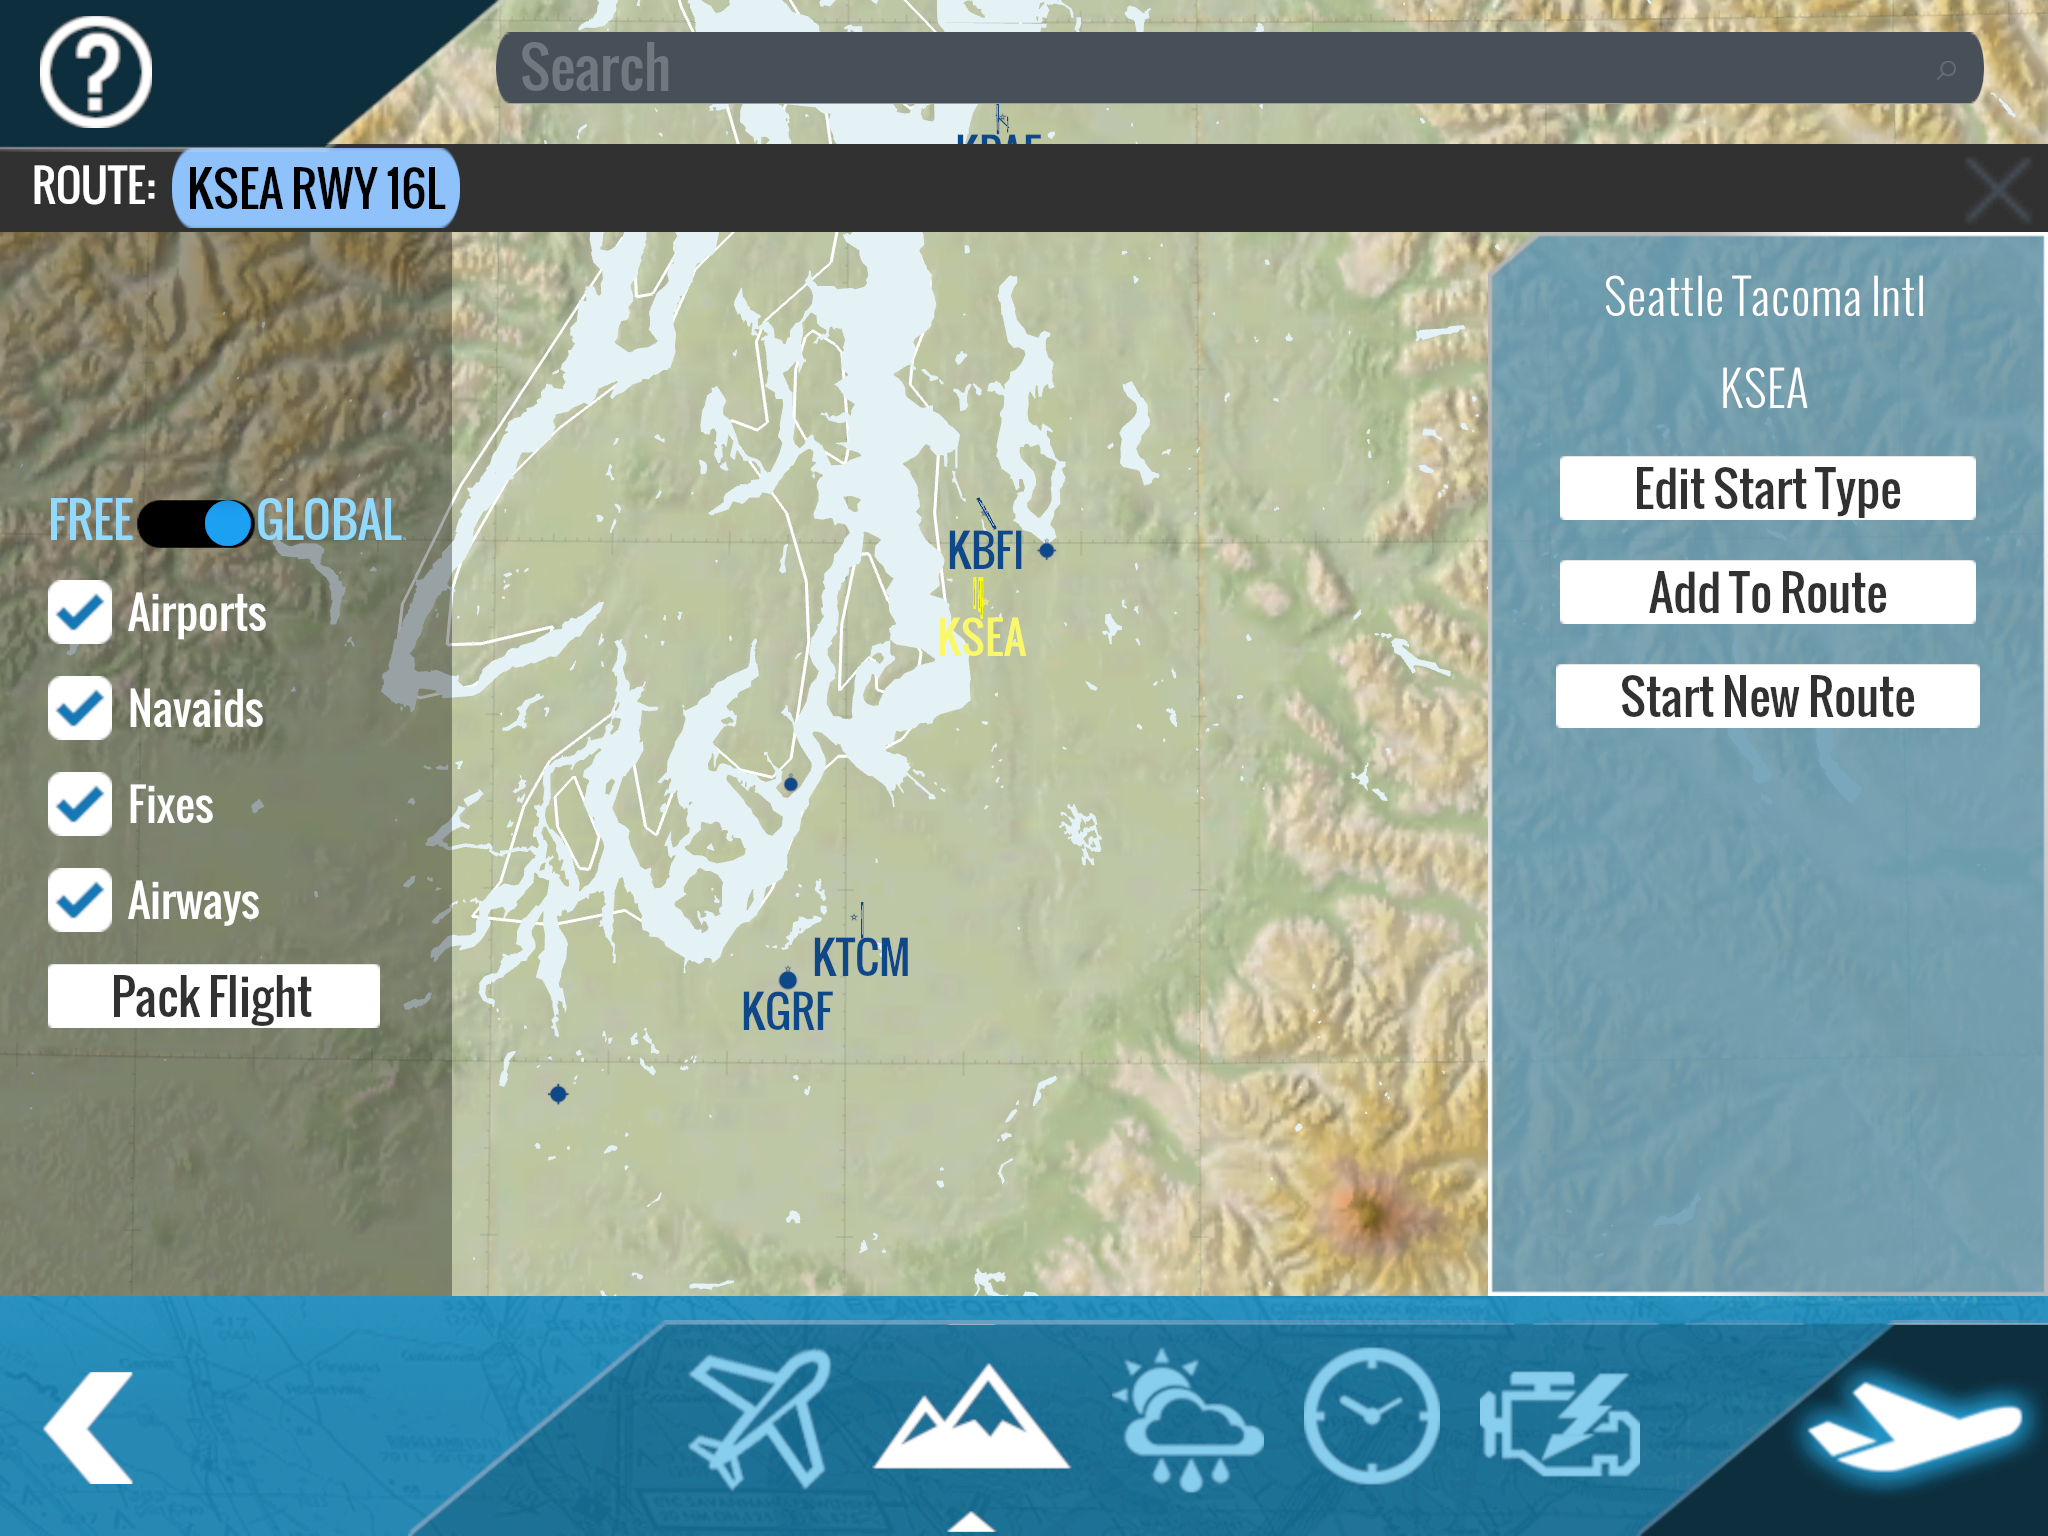
Figure 20: The location and route planning screen
Use the search bar, or drag a finger around the globe and zoom in to select your desired airport and route. Tap an airport, navaid, fix, or airway to add it to your planned route.
By tapping an airport, a menu with options to “Add to Route,” or “Start New Route” will open. Tap “Add to Route” to add your selection to the end of the current route. Tap “Start New Route” to make the selection the first stop on a new route. If you start a new route, the option “Edit Start Type” will appear. Tapping it will open a new window that allows you to pick if the aircraft starts at the end of a runway, at a ramp, or in the air on approach.
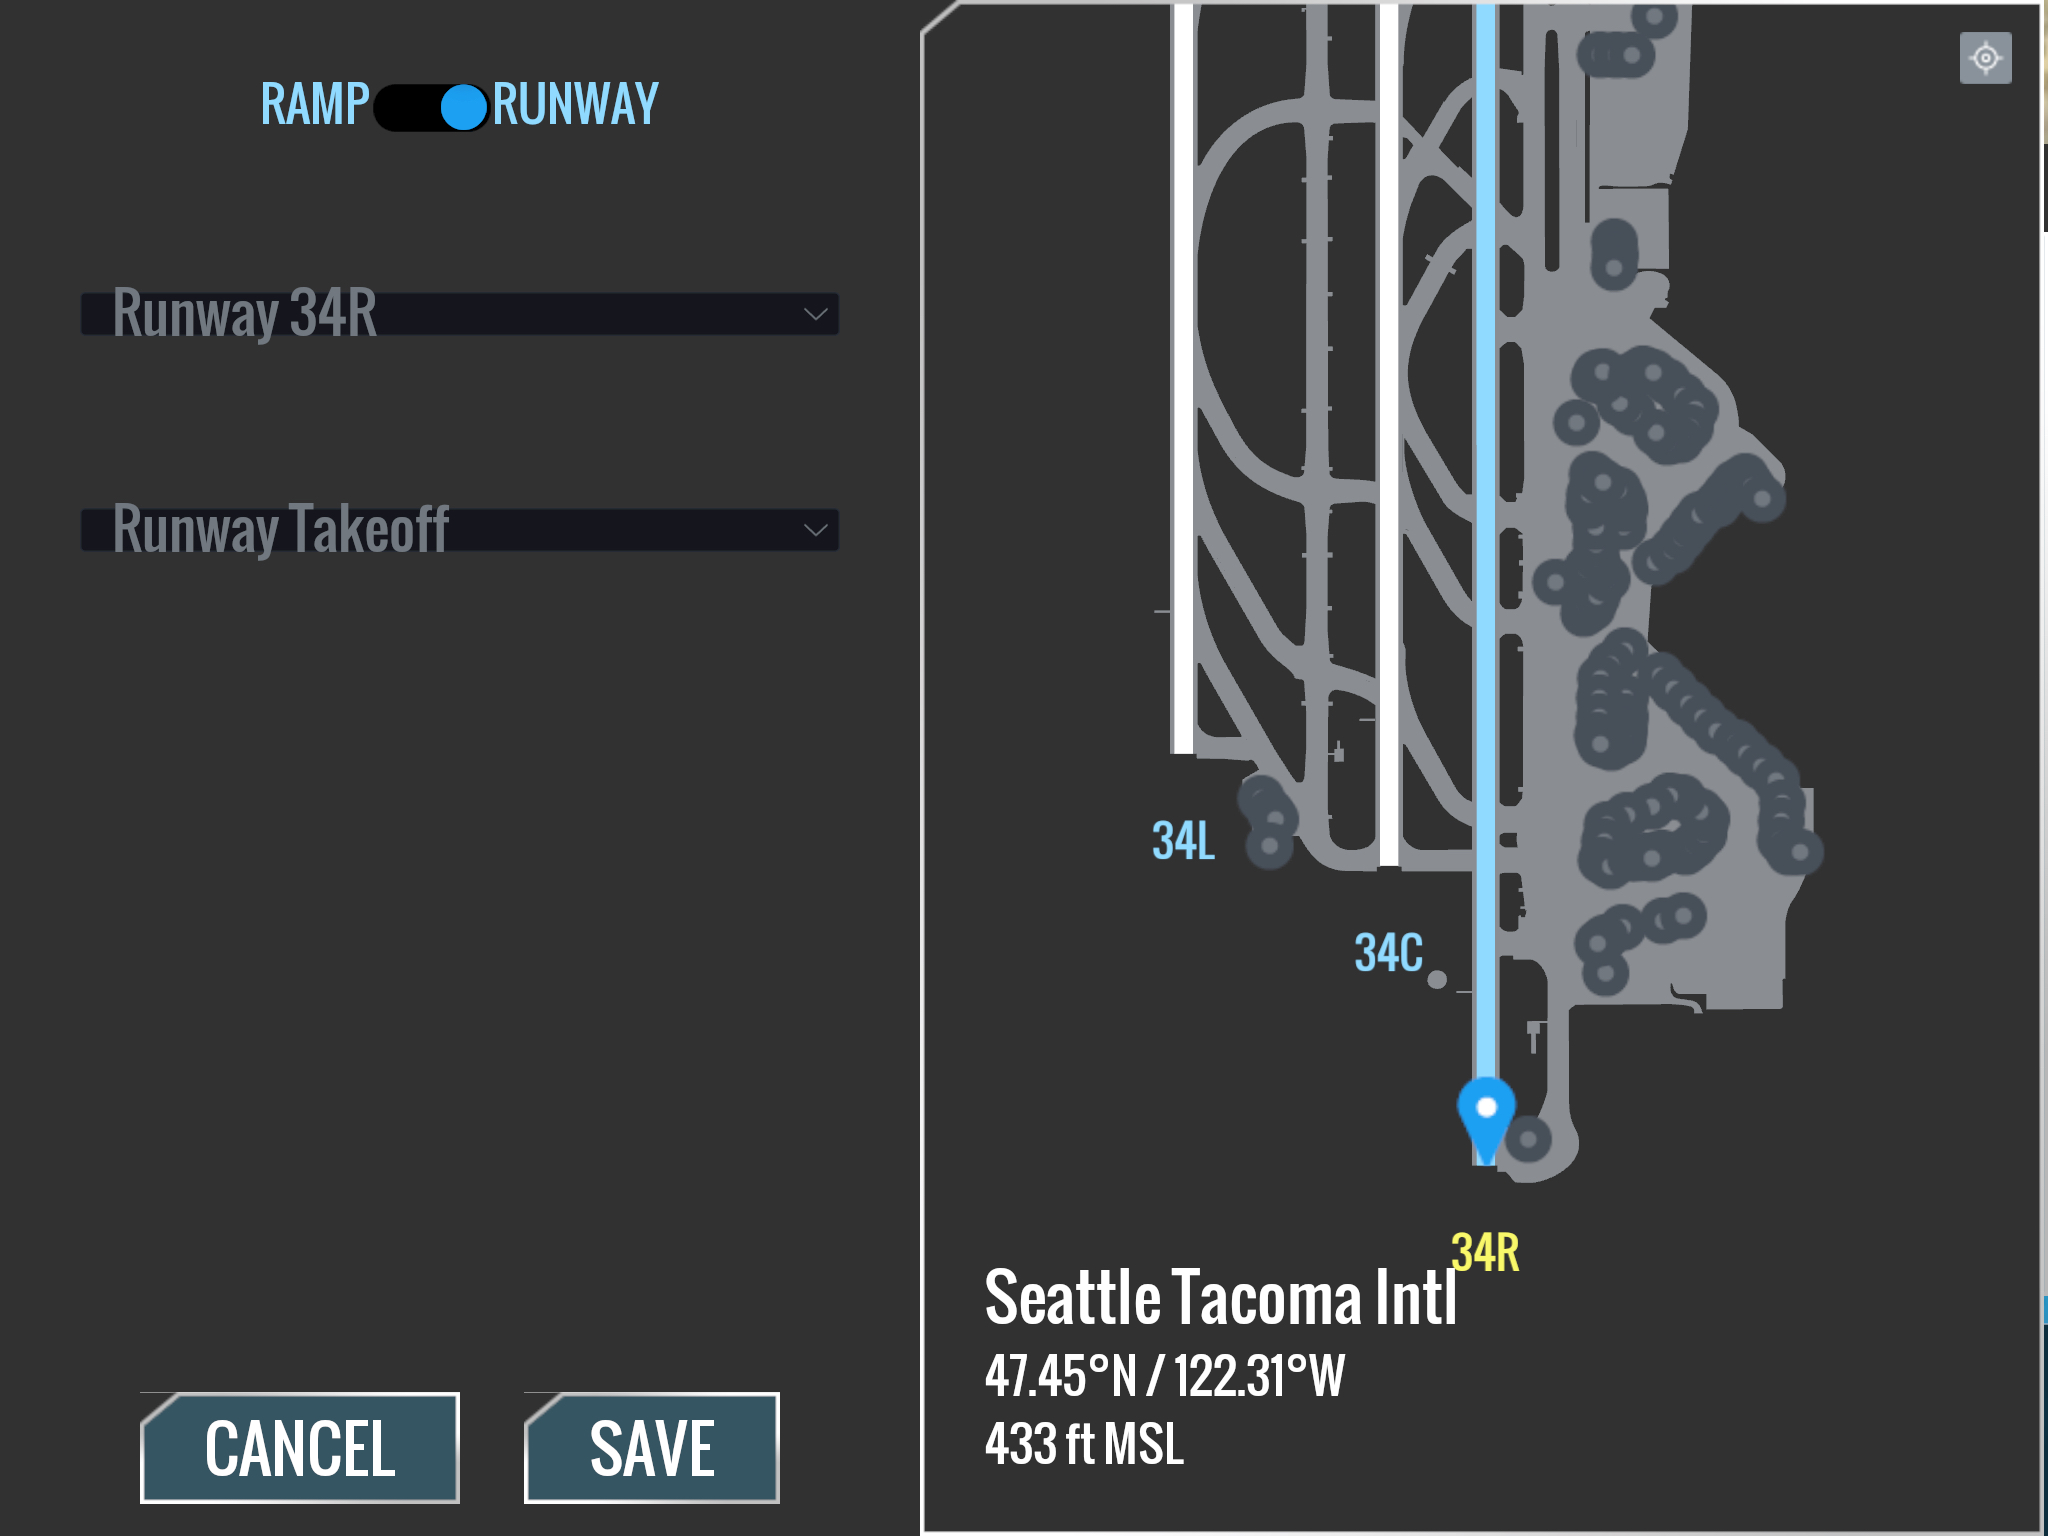
Figure 21: The detailed airport start screen
Tapping some navaids, fixes, or airways will also show an option to select a nearby airport in the right side window.
Currently there are four United States locations (Juneau, Seattle, Oahu, and the Grand Canyon) and one European location (Innsbruck, Austria) available as free scenery for non-subscribers.
Once you have you route planned out on this screen, you can use the “Pack” button on the left side to download all of the map, aircraft, scenery, and navigational data necessary for the flight route to your device. This will allow you to fly even without an internet connection.
If you do not “Pack” your route, you will need to have an internet connection at all times in order to fly the route. The app will download the minimum amount of files at the beginning of the flight, and continue to download files in the background as required as your flight continues.
To clear “packed” data off of your device and regain the storage space, go to the General tab of the Settings screen and tap the “Clear Downloaded Cache” button.
Rain cloud icon: Set the Weather
Change weather conditions for the flight here. Using the sliders, adjust how cloudy, windy or rainy your flight will be. Tap the “Advanced” button at the top of the screen for even more control over the weather options. There, the sliders adjust 12 different aspects of the clouds, winds and precipitation to provide detailed simulation.
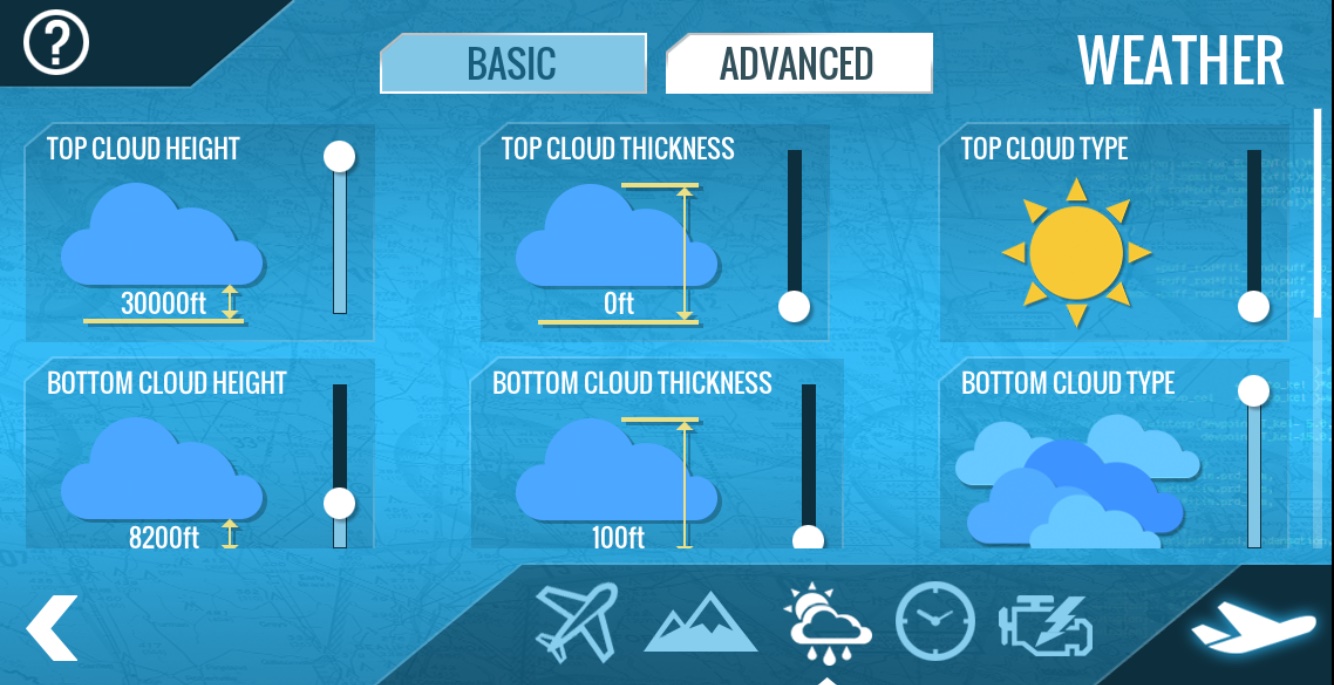
Figure 22: The "Advanced" weather screen
Clock icon: Adjust the Time
Use the slider to adjust the time of day for your flight.
Engine icon: Set up Failures
Simulate equipment failures or other emergency situations here. Scroll through the failure options by swiping up or down on the screen. Tap the “working,” “could fail,” or “failed” buttons to set up equipment failures or emergency situations to happen never, occasionally, or immediately.
Note that X‑Plane will remember what failures you have enabled for every flight until the settings are changed. Tap the “Set all to working” button to undo any failures.
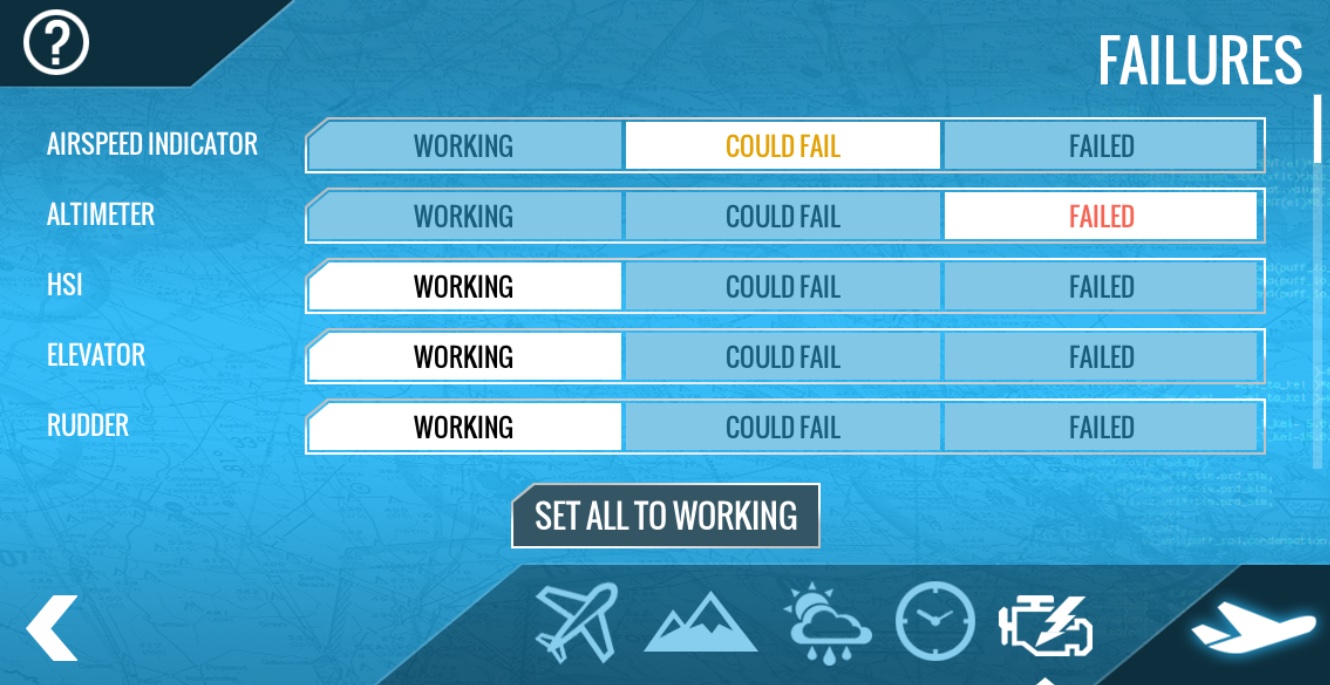
Figure 23: The "failures" screen, with the first option set to occasionally fail, and the second option set to fail during the next flight
Aircraft-Specific Settings
On the aircraft selection screen, tap the two gears to the right of the aircraft description to change settings that are specific to each aircraft.
You can adjust the Payload Weight to simulate passengers, baggage or cargo. An airplane can typically stay in the air at very high weights, but it will have a hard time getting off the ground initially.
You can adjust the amount of fuel in addition to the payload weight and the graph will indicate if you’re overweight or not. You can fly overweight if you’d like to, but expect degraded aircraft performance.
Additionally, moving the center of gravity forward (left on the slider) makes the plane behave more like a dart, and moving the center of gravity aft (right on the slider) makes the plane more unstable, and potentially unflyable—-it wants to flip around with the heavy end in the front and the fins in the back.
Finally, the “Start with Engines Running” option allows you to start the flight with the engines off (known as “cold and dark”) or running. Uncheck this box if you’d like to run through full start up procedures in aircraft that have full manipulators in the cockpit.
Tap “Save” in the bottom right corner to keep any changes, or the “Reset Defaults” button can be used to set the sliders back to their original spots.
Navigation in Freeflight
Available only in Freeflight, the map can be accessed by dragging or tapping the map’s drawer ‘handle’ (which can be found on the left side of the screen), and can be closed by reversing the gesture. You can move the map around by dragging a finger on the screen, rotate the map by turning two fingers on the screen, zoom in by dragging two fingers apart, and zoom out by pinching two fingers together.
Note: The map cannot be accessed when using a game controller.
From within the map screen you can obtain a lot of information by tapping aircraft, airports, VORs and localizer/ILS beams. This will open up a window where you can:
- Change the location of your aircraft
- Find navigation frequencies and tune radios
- Change runways or set up final approaches
Tap anywhere outside of the pop up window to close it.
Understanding the Map
The maps available during Freeflight provide a lot of information on the area, including topography and selectable NAVAIDs. Every location’s map is made up of ticked, thin black lines that make “boxes” officially named “Quadrangles.” Each box is 1/4 of a degree of latitude and longitude.
The large blue numbers in the boxes are called “Quadrangle Altitudes” but are more commonly known as “Maximum Elevation Figures.” They’re altitudes in hundreds of feet (so 33 means 3,300 feet) and they show you the lowest altitude you can be at in that box and be guaranteed not to run into a mountain.
The thick blue and gray lines running across the maps are airways, which are basically like highways in the sky. The white triangles along them are “fixes.”
Small airports are indicated by blue or magenta circle with notches while airports with larger runways do not have a circular shape, but are instead shown as blue or magenta expanded runway layouts. Airports shown in blue have control towers in the real world.
The earliest type of navigation modeled in X‑Plane Mobile is based on NDBs (non-directional beacons) which consist of a ground-based transmitter that broadcast a homing signal. A receiver in the aircraft could be tuned to one of about 300 discrete frequencies in order to tune to a particular transmitter. With that done, an instrument in the panel, called the NDB (or, interchangeably, the ADF, or Automatic Direction Finder), would point to the station. NDBs are represented on the map as a solid brown circle surrounded by multiple dotted circles.
VOR signals (that is, signals from a Very High Frequency Omnidirectional Range transmitter) were the next chronological step in navigational technology. VOR transmitters work by sending a series of 360 discrete little carrier tones on a main frequency. Each of these carriers is oriented along a different radial from the station, one of 360 just like on a compass rose. Thus, when a pilot is flying along and tunes in the main VOR frequency, s/he then fine tunes the navigation display to tell which of the 360 radials the aircraft is flying, and also whether the transmitter station is in front of or behind the plane.
Another type of VOR beacon, a VORTAC, is a transmitter that combines both VOR and TACAN features. TACAN (or tactical air navigation) provides special information to military pilots similar to a civilian VOR. A VOR-DME combines the lateral guidance (that is, guidance left and right) of a VOR with the distance guidance of a DME (distance measuring equipment). However, for our purposes, both of these are functionally identical to a VOR.
In the X‑Plane Mobile maps, VOR/VOR-DME/VORTAC beacons appear surrounded by a dark blue compass rose.
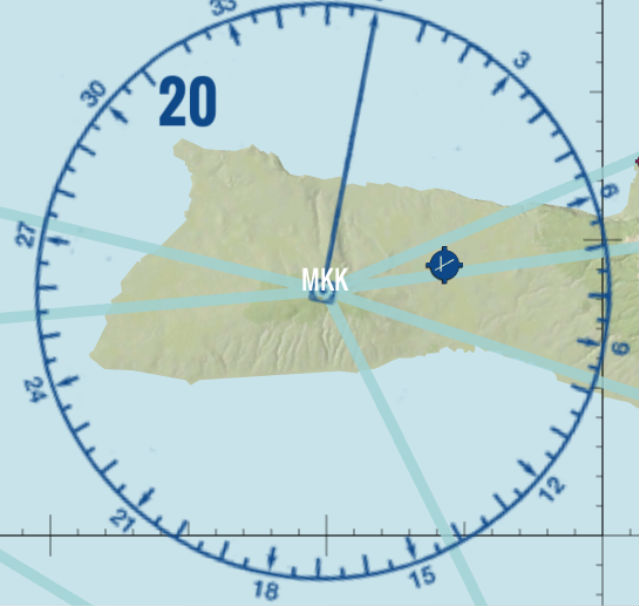
Figure 24: A close-up on a VOR
A LOC (or localizer) transmitter provides guidance to the centerline of a runway. It works by sending out two signals on the same channel, one of which modulates at 90 Hz and the other of which modulates at 150 Hz. One of these signals is sent out slightly to the left of the runway, while the other sent out slightly to the right of it. If an aircraft is picking up more of the tone modulated at 150 Hz, it is off to the left. If it is picking up more of the tone modulated at 90 Hz, it is off to the right. The course deviation indicator (or CDI) in the instrument panel then indicates this so that the pilot can correct it. When both tones are being received in equal amounts, the craft is lined up with the physical centerline of the runway.
In X‑Plane Mobile, a LOC transmitter or ILS beam is marked by a black arrow coming off a runway, as in the image below.
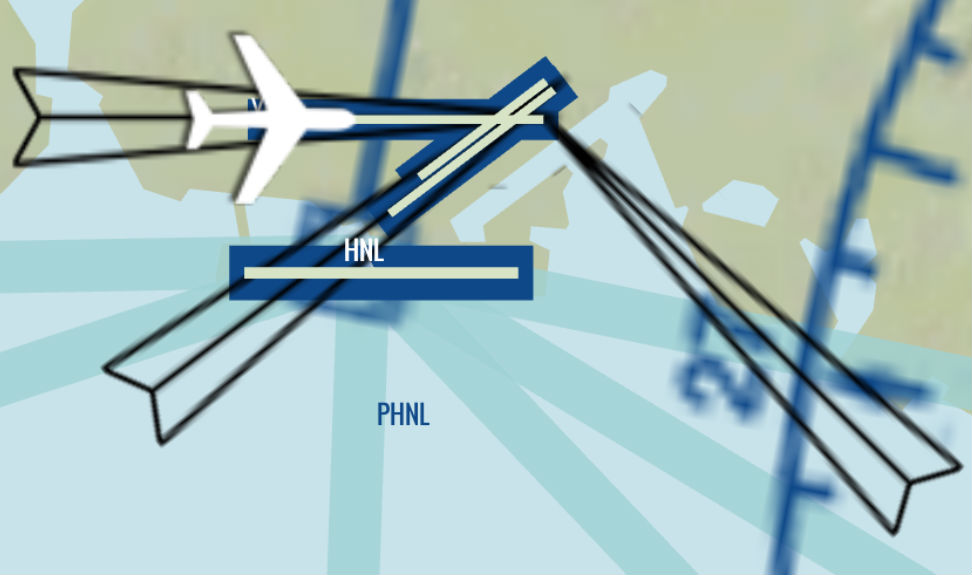
Figure 25: Close-up on an ILS
Using the Map
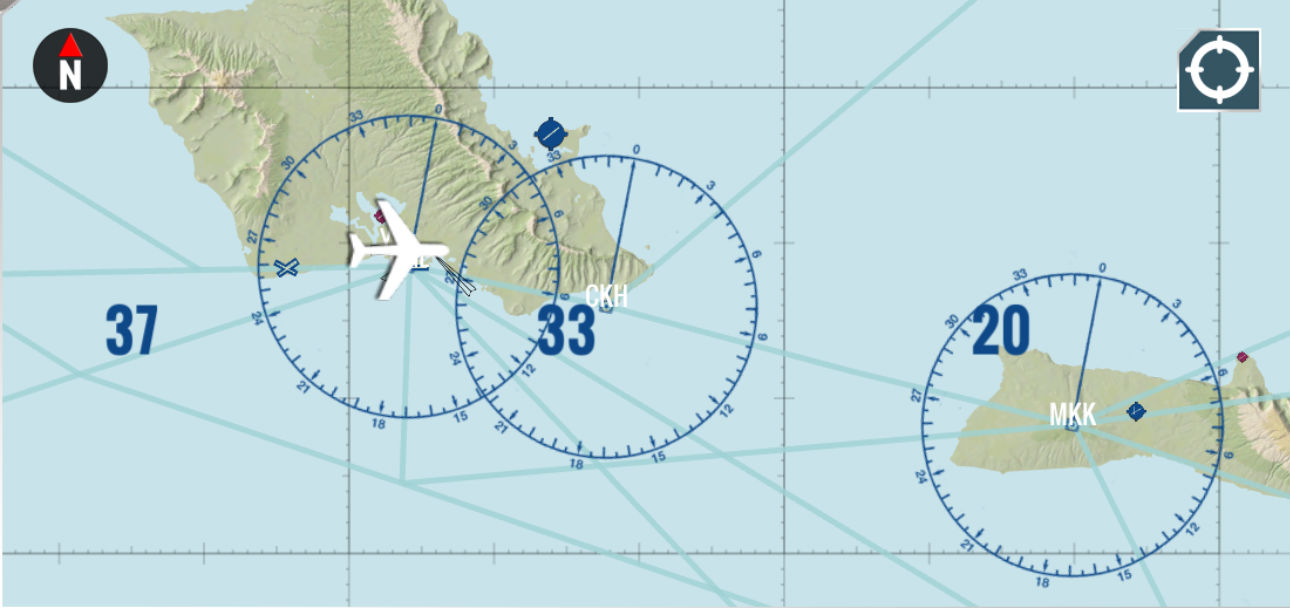
Figure 26: The map available during Freeflight
Tapping your aircraft will show information on its current heading, speed, and altitude. You can drag it anywhere on the map to reposition it, but be aware of your altitude and that of the land features around you–you don’t want to run into anything!
Tap the compass icon in the top left corner to change whether the top of the map is North (icon will show an “N”) or the aircraft’s heading. Change the top of the map to be whatever you want by rotating it with your fingers. While zoomed in, you can center the view on the aircraft by tapping the icon in the top right corner. This will also lock the map view onto the aircraft so that as you fly, the map will scroll underneath it and the aircraft will stay in the center. While locked onto the aircraft, the top of the map will be wherever the aircraft is heading, so if the plane is flying south, the top of the map will be south. If the plane banks to the east, the map will automatically rotate and east will now be on top. Drag anywhere on the map to break the lock.
Tapping an airport will select it and open a list of available runways to depart from. You can also select “Final” to start a 10nm final approach to that runway. Tap a localizer beam to select it and tune your radios or set up an approach. This will also automatically set the OBS for the approach.
Tap a VOR to see its name and frequency. Tap one of the “Tune” buttons to set your navigation radio.
Massively Multiplayer Online (MMO)
You can join a massively multiplayer online (MMO) flight from the X‑Plane Mobile main menu.
X-Plane Mobile MMO is a single shared world, allowing you to fly with anyone. It no longer matters if your friends are on iOS or Android, or if they live down the street or across the globe. While a subscription is required for instant (and constant) access to MMO, free trials are available after a brief waiting period.
Tap “Massive Multiplayer” to fly with any other X‑Plane users currently at the airport you select.
First select an aircraft and, if desired, set your callsign by tapping the mic icon at the bottom right of the screen.
You can choose any location in the world by using the “Advanced…” button at the bottom of the location screen, but the Basic screen provides a list of popular airports to help your chances of making a match with other players. The app also promotes a Fly-In of the Day location to ensure you always have people to fly with.
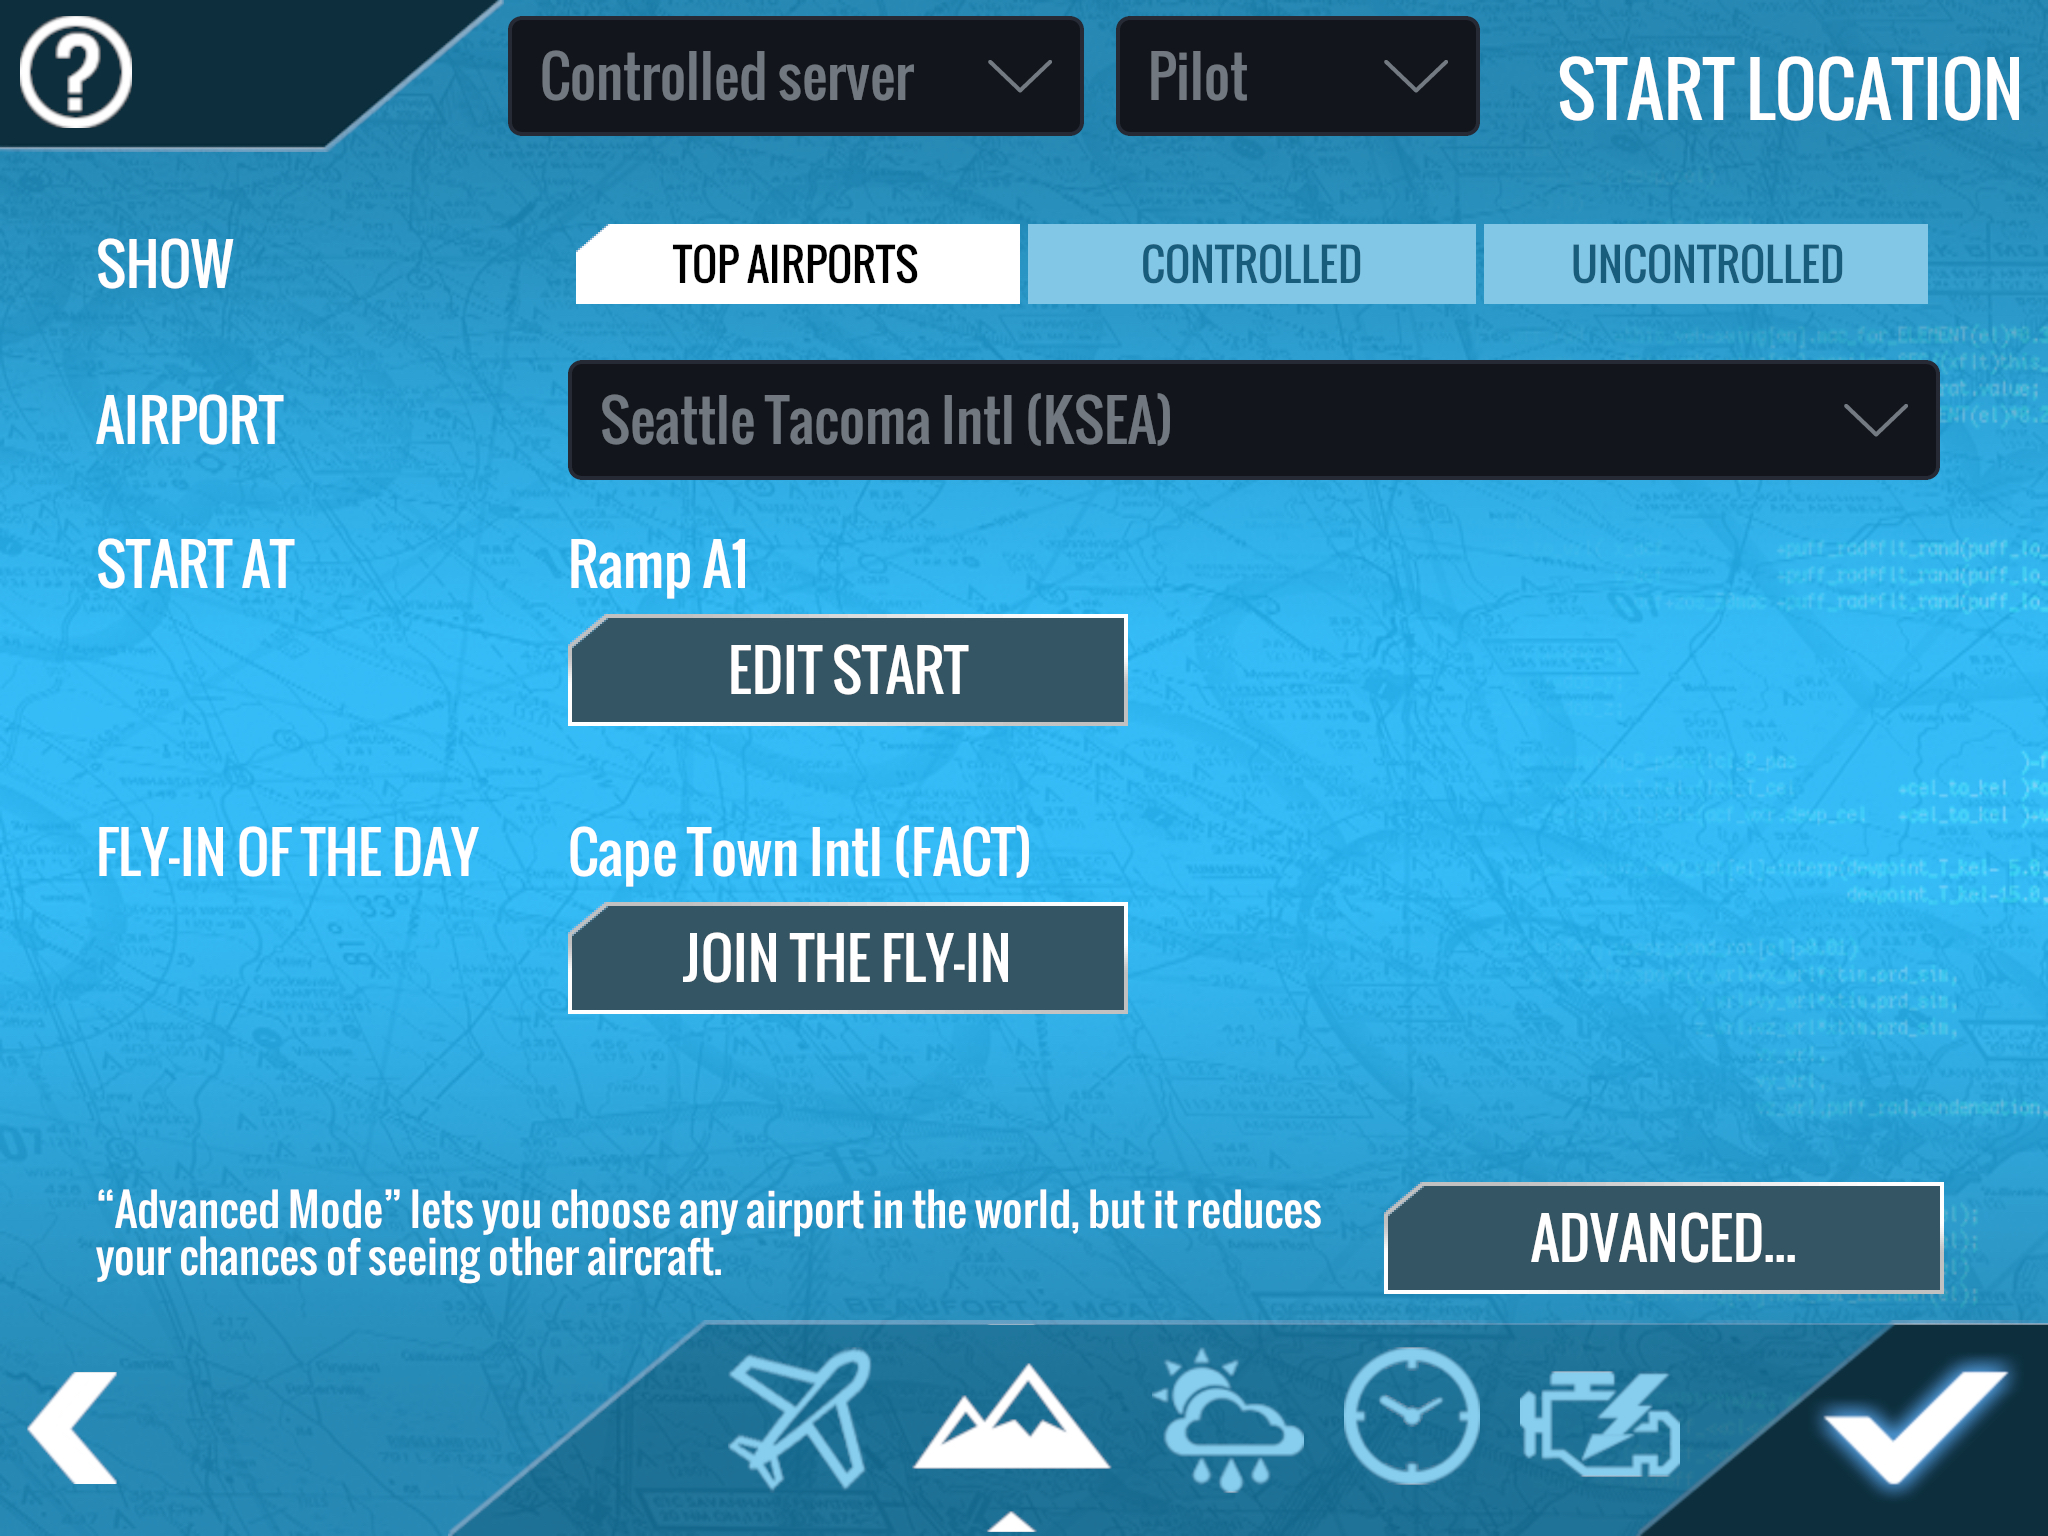
Figure 27: The Fly-In of the Day selected for MMO
You can adjust your starting location to a ramp, runway end or approach with the Edit Start button. From any screen you can pick between the “Uncontrolled server” (without ATC) or the “Controlled server” (with ATC). Note ATC in X‑Plane Mobile requires users to act as air traffic controllers—ATC is not automated in the mobile app. Thus, if you select the “Controlled server,” you can then choose to act as a pilot or air traffic controller. See the section “[Working with ATC][]” for details on using or acting as ATC.
Tap “Controlled” to see a list of top airports that have at least one person acting as ATC. Tap “Uncontrolled” for a list of top airports without active ATC.
You can also turn on failures for your aircraft, or adjust the weight, fuel, or center of gravity. Real world weather is always used in MMO, but you can adjust the time of day. Tap the white check mark in the bottom right corner to continue to the flight.
Aircraft Registration
Tap the radio icon on the aircraft picker screen to customize your aircraft’s registration, which may be displayed to other MMO players. The format changes depending on what type of aircraft you have chosen to fly.
For small, general aviation planes, select the country the aircraft is registered in from the drop down, then type in up to five additional characters. For airliners, your callsign should be your airline and flight number (e.g., American flight 123 would have a registration of AAL 123). You can also reset to default or randomize the registration if desired.
CTAF Communication
While in an MMO flight on the “Uncontrolled server,” you can access UNICOM/CTAF services by tapping the radio icon in the upper right corner, near the menu icon.
The options in this window will be appropriate for your current position (i.e., on the ground versus in the air) and will update as you fly. Use these options to self-announce your position and intentions to other players. Messages from others will be displayed at the top of the screen in white, while your messages will be in yellow, and messages disappear after some time.
Note that X‑Plane can automatically switch between the correct controllers for you if you check the “Auto-tune recommended frequencies” box, or you can tune your radios by hand.
Communicating with ATC
While in an MMO flight on the “Controlled server,” if at least one other user is acting as an air traffic controller at your location, you can access live ATC services by tapping the radio icon in the upper right corner, near the menu icon.
The options in this window will be appropriate for your current position (i.e., on the ground versus in the air) and will update as you fly. Use these options to interact with ATC and broadcast your intentions to other players. Messages from others will be displayed at the top of the screen in white, while your messages will be in yellow, and messages disappear after some time.
Note that if either your departure or destination airport has a controller, or a controller comes online while you’re flying, a flight plan will be required. To file a flight plan before joining controlled airspace, tap the “Advanced” button in the location page. Then add airports, navaids, fixes or airways as described in the section “Changing the Freeflight Scenario” to your planed route.
If you are already in a flight, tap the mic icon to open the ATC UI to enter a flight plan that contains at minimum your starting and destination airport. You can add additional waypoints by using the “Add Waypoint” button.
Note that X‑Plane can automatically switch between the correct controllers for you if you check the “Auto-tune recommended frequencies” box, or you can tune your radios by hand.
Acting as ATC
While in an MMO flight on the “Controlled server,” if you choose the “Controller” role, you can act as air traffic control for people using MMO as “pilots.” Note that a Pro Subscription is not required to act as a controller.
The first person to select the Controller role at any airport will become a tower controller, then approach, departure and ground become active as more Controllers join that location. Clearance delivery is only available if there is already an active ground controller.
If another controller at the same airport goes offline, a popup should appear indicating if your role has changed. For example, a ground controller would become tower, clearance delivery would become ground, and if there is an approach or departure controller but no ground, that controller becomes the tower controller.
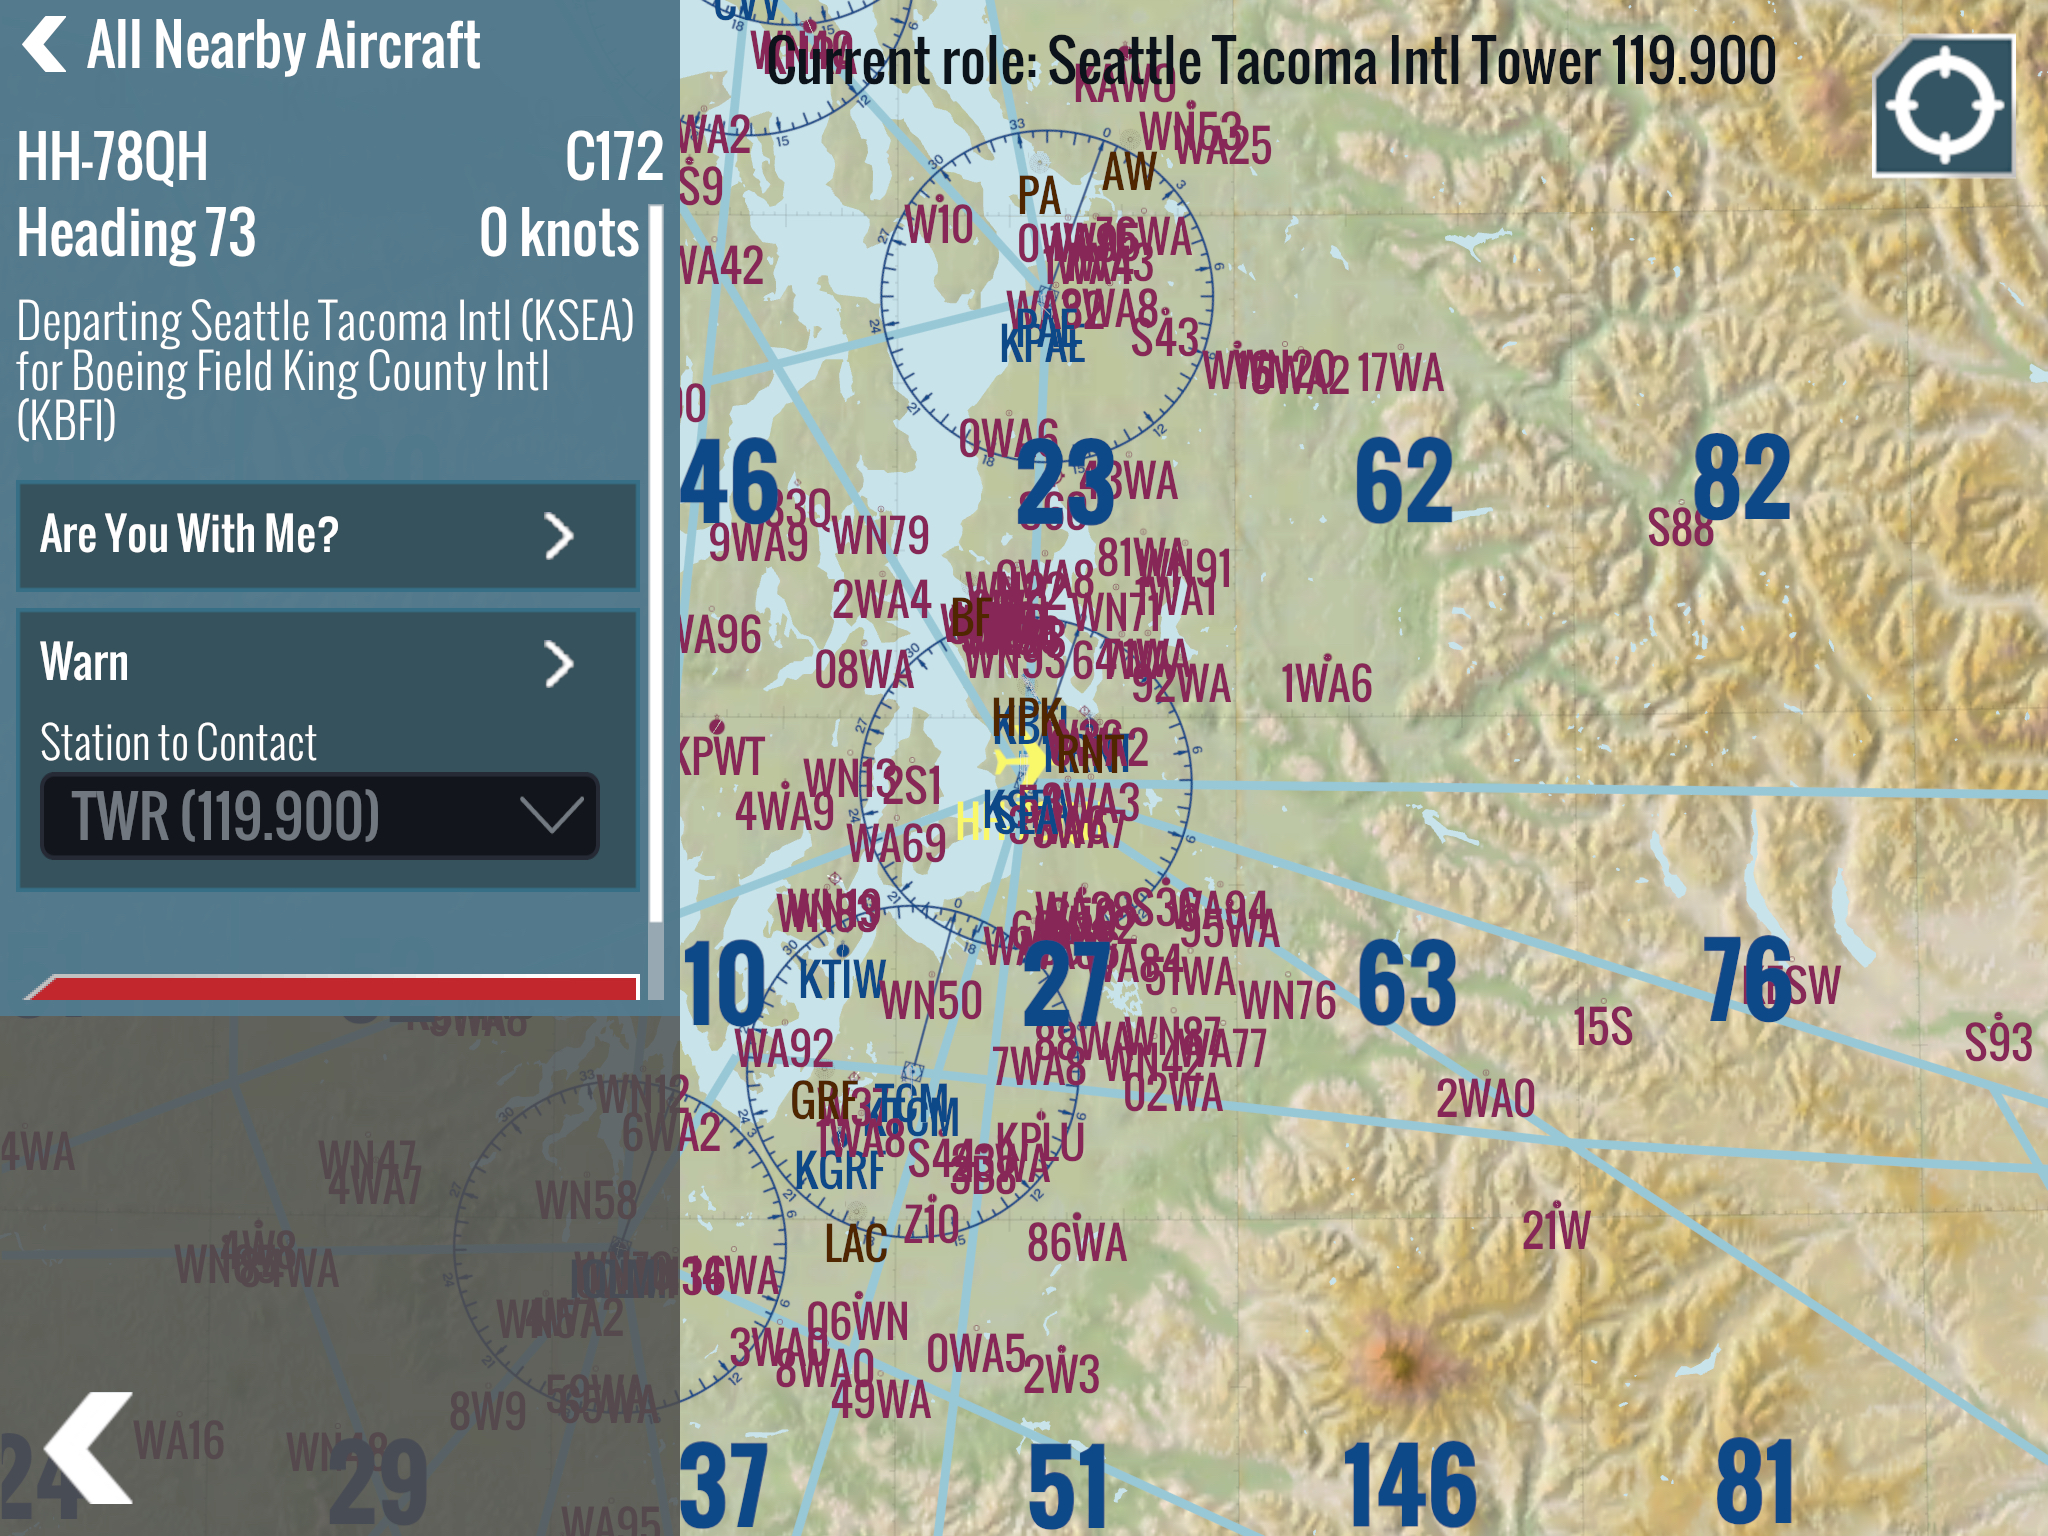
Figure 28: Options when acting as ATC.
When interacting with an aircraft, all messages sent to and from that aircraft are displayed in the lower-left corner, regardless of frequency. The messages you can send are contextually relevant, based on your role and the other available controllers. For example, when instructing a pilot to contact another frequency, only frequencies that actually have a controller are available.
Combat
Combat is available in air-to-ground bombings in the Challenges section. Fighter aircraft such as the F-22 Raptor, A-10 Thunderbolt II & F-4 Phantom are equipped with guns, air-to-air missiles, and bombs in X‑Plane Mobile. The icons that control these weapons are shown in the image below.
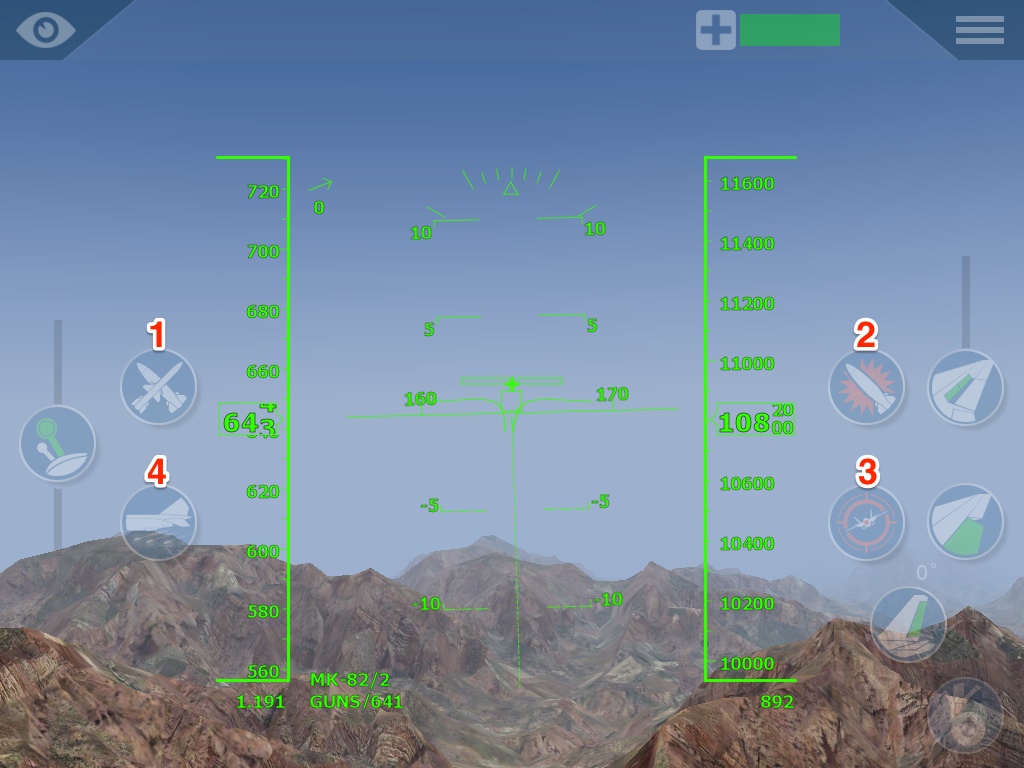
Figure 29: The controls for selecting weapons
No weapons are armed by default, so tap the button labeled 1 in Figure 28 to swap between no weapons, missiles and bombs. The weapon that is currently armed displays in the icon numbered 2, and tapping it will fire the weapon. The button below that (labeled 3 in the image above) will fire the gun. The button labeled 4 will release flares to help you avoid opponents' missiles.
Check out the Flight School tutorial “Bombing Ground Targets” for a step by step tutorial on using the weapons.
Using the Targeting Reticle
The targeting reticle always follows the enemy’s aircraft. If the enemy is visible on screen, it will appear as a green box pointing at the opponent’s craft. If you lose track of your opponent, the reticle will be “dragged” to the edge of the screen. You can follow this yellow arrow to find them again. The reticle’s targeting breaks down, though, when the opponent’s aircraft is very close to the user’s, or when it is directly on the user’s tail. In this case, the reticle will bounce around from full left deflection to full right deflection. This is simply a limitation associated with trying to point in three dimensions while using a two dimensional display.
Using the Gun
When firing a gun, be sure to lead opponents or targets–in other words, fire at where they will be, not where they are. Mastering so-called “high deflection shooting” can make the difference between ending a fight quickly and losing it entirely. Whereas the surest shot will always come when a pilot is right on an enemy’s tail, a high deflection shot comes from beside or in front of the enemy. In most cases, a pilot has only a split second in which the enemy will cross his or her path of fire, so timing is critical.
Using the Missiles and Bombs
The AIM-9 missiles in the fighter aircraft are heat seeking, so they will more or less lock on to an enemy automatically, even when fired from a good distance. When you are locked onto your enemy, the circular targeting reticule will turn red and the HUD sound effect will change. While this makes it relatively easy to score a kill on an enemy, that enemy is equipped with the same missiles, so be prepared to jink (rapidly deflect the flight controls into turns in different directions) when the return fire comes. Fighter aircraft are also equipped with flares (labeled 4 in Figure 28 above) that can be deployed to evade your opponent’s missiles.
The Mark 84 bombs are unguided so using the targeting reticle to line up your drop is of utmost importance. It will take into consideration your speed, orientation, and ground elevation to determine where your weapon will land. Try dive bombing targets for the best accuracy, while juking to avoid their return fire.
Strategy
The key to winning a dogfight lies in creating a situation where your aircraft’s strengths are emphasized and an opponent’s weaknesses are exploited. This means trying to force a tight, up-close battle when flying a more maneuverable fighter than the enemy, or aiming for dive-bombs and other tactics requiring speed and weight when flying a faster, larger craft.
Additionally, do not underestimate the value of quick combat maneuvers, such as:
- corkscrews—rolling your craft left or right while continuously varying its pitch
- feints—rolling to one side as though to go into a banked turn (i.e., a turn with the craft on its side, while pulling back on the controls in order to pull “in” to the turn), but pushing the nose forward instead
- barrel rolls—often described as “a cross between a roll and a loop”
See the Flight School tutorial “Fighter Basics” for a walk-through of some of these maneuvers.
Making In-App Purchases
X-Plane Mobile has two levels of subscriptions available to purchase within the app. You can purchase or change your subscription level from within the app Settings screen, on the Purchases tab. The “Professional” version provides access to all global scenery, airports, and aircraft, while the “Basic” version provides access to only global scenery and airports, and aircraft must be purchased individually. If you have purchased aircraft in previous versions of the app, you will have access to all of your purchased aircraft at any subscription level.
Either level can be purchased monthly or for an entire year at a reduced rate. Tap the “Google Subscription Website” (Android) or “Manage Subscription in the App Store” (iOS) button to cancel or modify your subscription through the respective app store instead of within the X‑Plane app. Tap your desired subscription level, then enter your Apple ID or Google Play account password. Confirm your purchase then go fly!
You can purchase and unlock an individual aircraft from within Freeflight or Challenges. You can see which aircraft have yet to be purchased in Freeflight–swipe left or right on the screen to find any aircraft which have a green button with a price.
Tap this button, then enter your Apple ID or Google Play account password. Confirm you want to buy the aircraft and it will unlock along with any challenges that it features in. If you ever lose access to aircraft you know you previously purchased, log in to the store ID you used to make the original purchase, then use the purchase option again. Neither Apple nor Google will allow people to make duplicate purchases, so you will not be charged again.
Updating the App
To update X‑Plane Mobile on Apple devices such as iPads, iPhones, and iPods, go to the Apple App Store, then tap Updates down at the bottom of the screen (selected in Figure 29).

Figure 30: Selecting the Updates tab in the Apple App Store
There, tap the Update All button in the top left corner to install any updates available on all apps on the device, or scroll through the application list to X‑Plane and tap the Update button on the right side to update only it.
The device may prompt for the ID and password which were used to purchase the application, then it will automatically download and install the updates.
On Android devices, updates are made through the Google Play Store. Tap the hamburger menu icon (the three lines at the top left) and select “My apps & games” from the list. Figure 30 shows the X‑Plane Flight Simulator app under the section for updates. Tap “Update” to install the latest version.
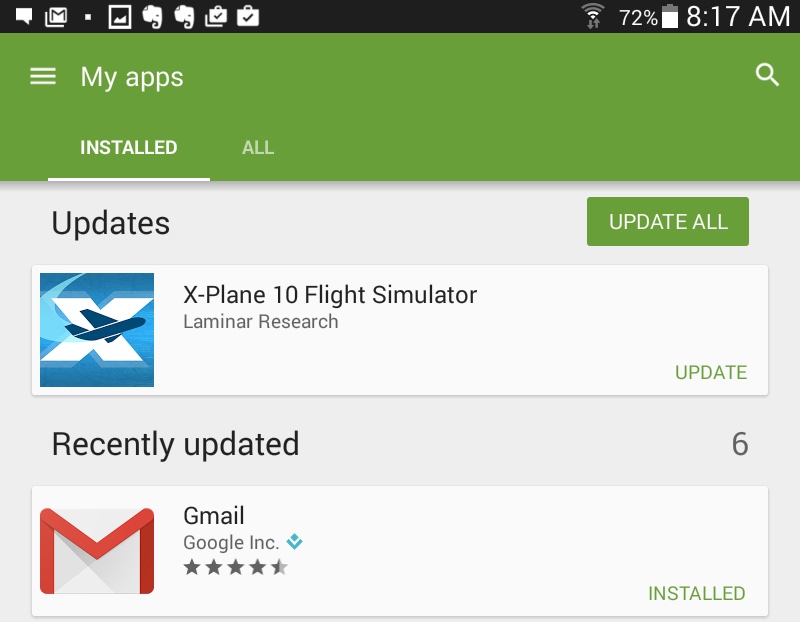
Figure 31: Updating X‑Plane Mobile in the Google Play Store.
Tech Support
The most common technical issue that X‑Plane customer support encounters with the X‑Plane applications is caused by the hardware exceeding its RAM allocation.
Many users leave their device on for weeks or months at a time, as the hardware appears to be off when it is in fact in standby mode. In some cases, this can cause too much “garbage” to be stored in the RAM. If the “garbage” isn’t cleaned out of the RAM periodically by restarting the device, it is possible that X‑Plane will exceed the available RAM, causing a crash or a loss of flight control (where the aircraft doesn’t respond to the tilting of the device).
The X‑Plane app is very demanding on the hardware, so if you are experiencing problems, first try quitting the app entirely. This is done on Apple devices by pressing the home button twice to bring up the task switcher screen. Swipe a finger to the left if the X‑Plane app is not visible, then tap it and drag up to quit. If problems persist, perform a reboot of the device by holding the power button down for three seconds, then using your finger to slide the power switch on the screen to off. Leave the unit off for two to three minutes before turning it back on.
Another common problem is missing aircraft. To fix this, first tap the gear icon in the bottom right corner of the app home screen. Tap the “Restore Purchases” button and enter the ID and password originally used to purchase the aircraft. Neither Apple nor Google will allow people to make duplicate purchases so it is safe to “repurchase” aircraft you know you had previously bought.
If you are having problems with how the aircraft are behaving in Freeflight or multiplayer, double check that the autopilot is not on and that all failures are set to working.
If none of these solutions have solved your problem, first search for a solution on the X-Plane Support page.
Appendix: Game Controller Button Assignments
Nearly any Bluetooth gaming controller should work with the X‑Plane Mobile app.
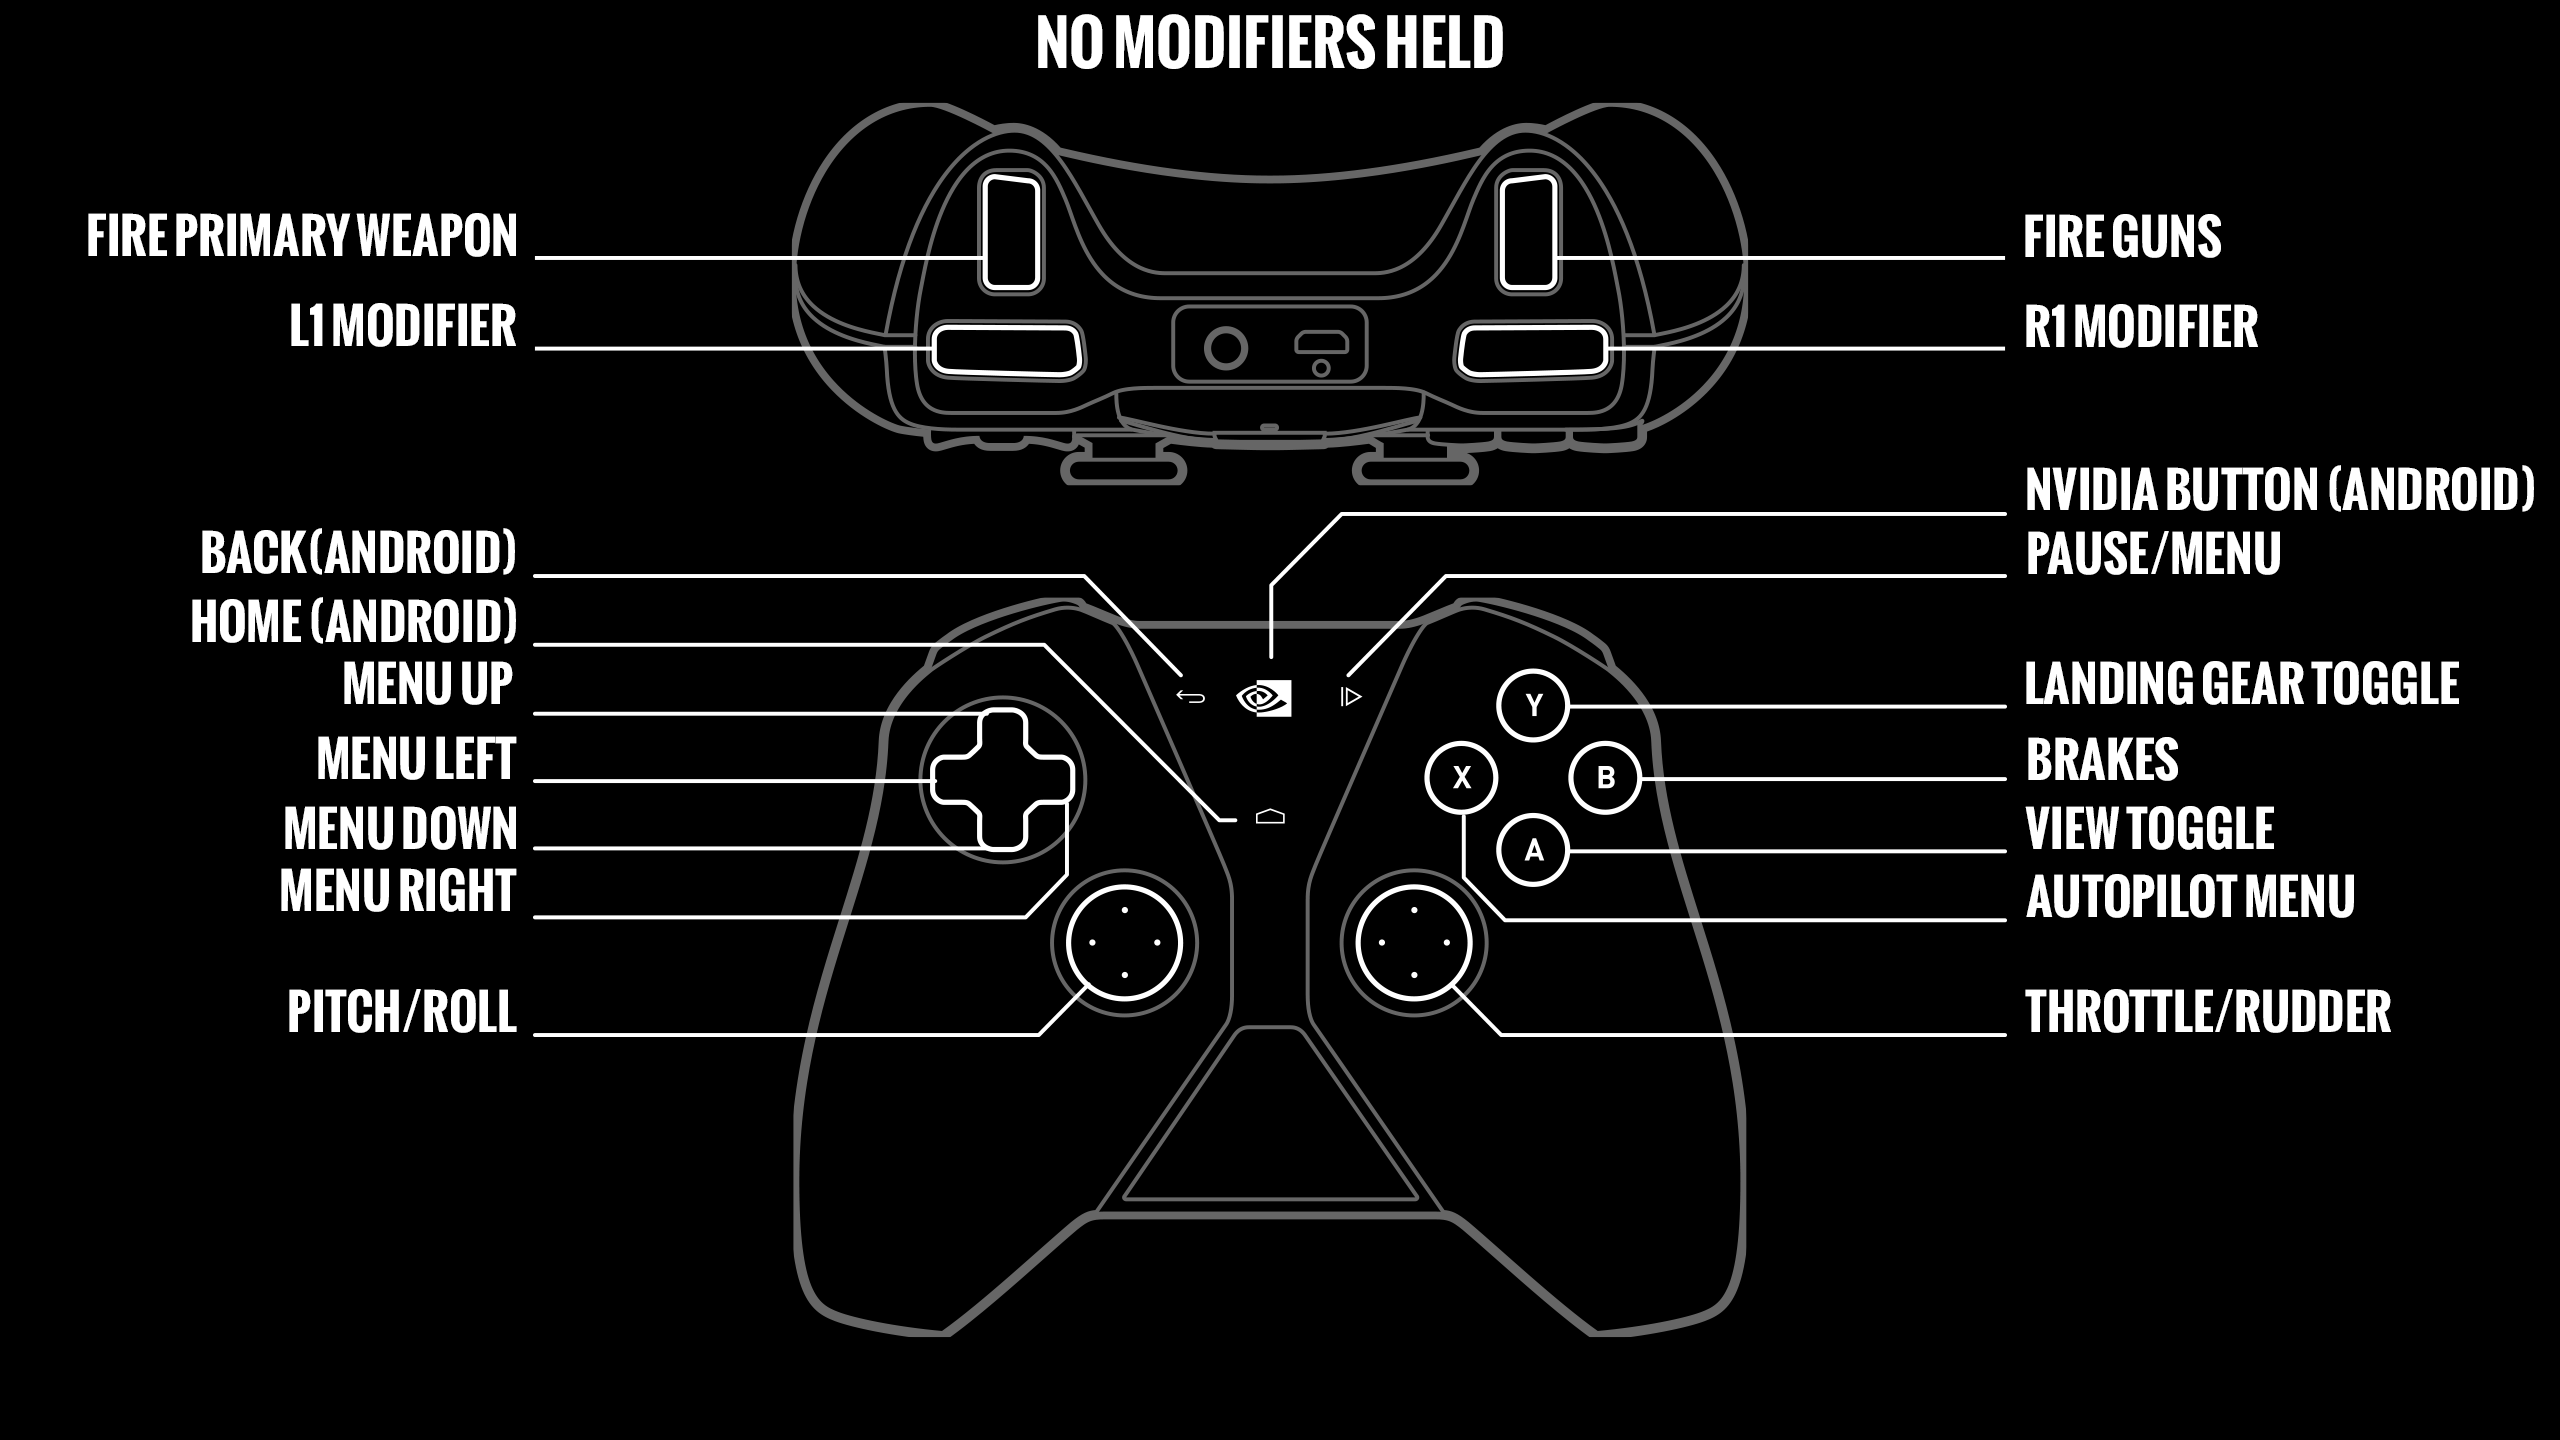
Figure 32: Standard button assignments on a bluetooth controller.
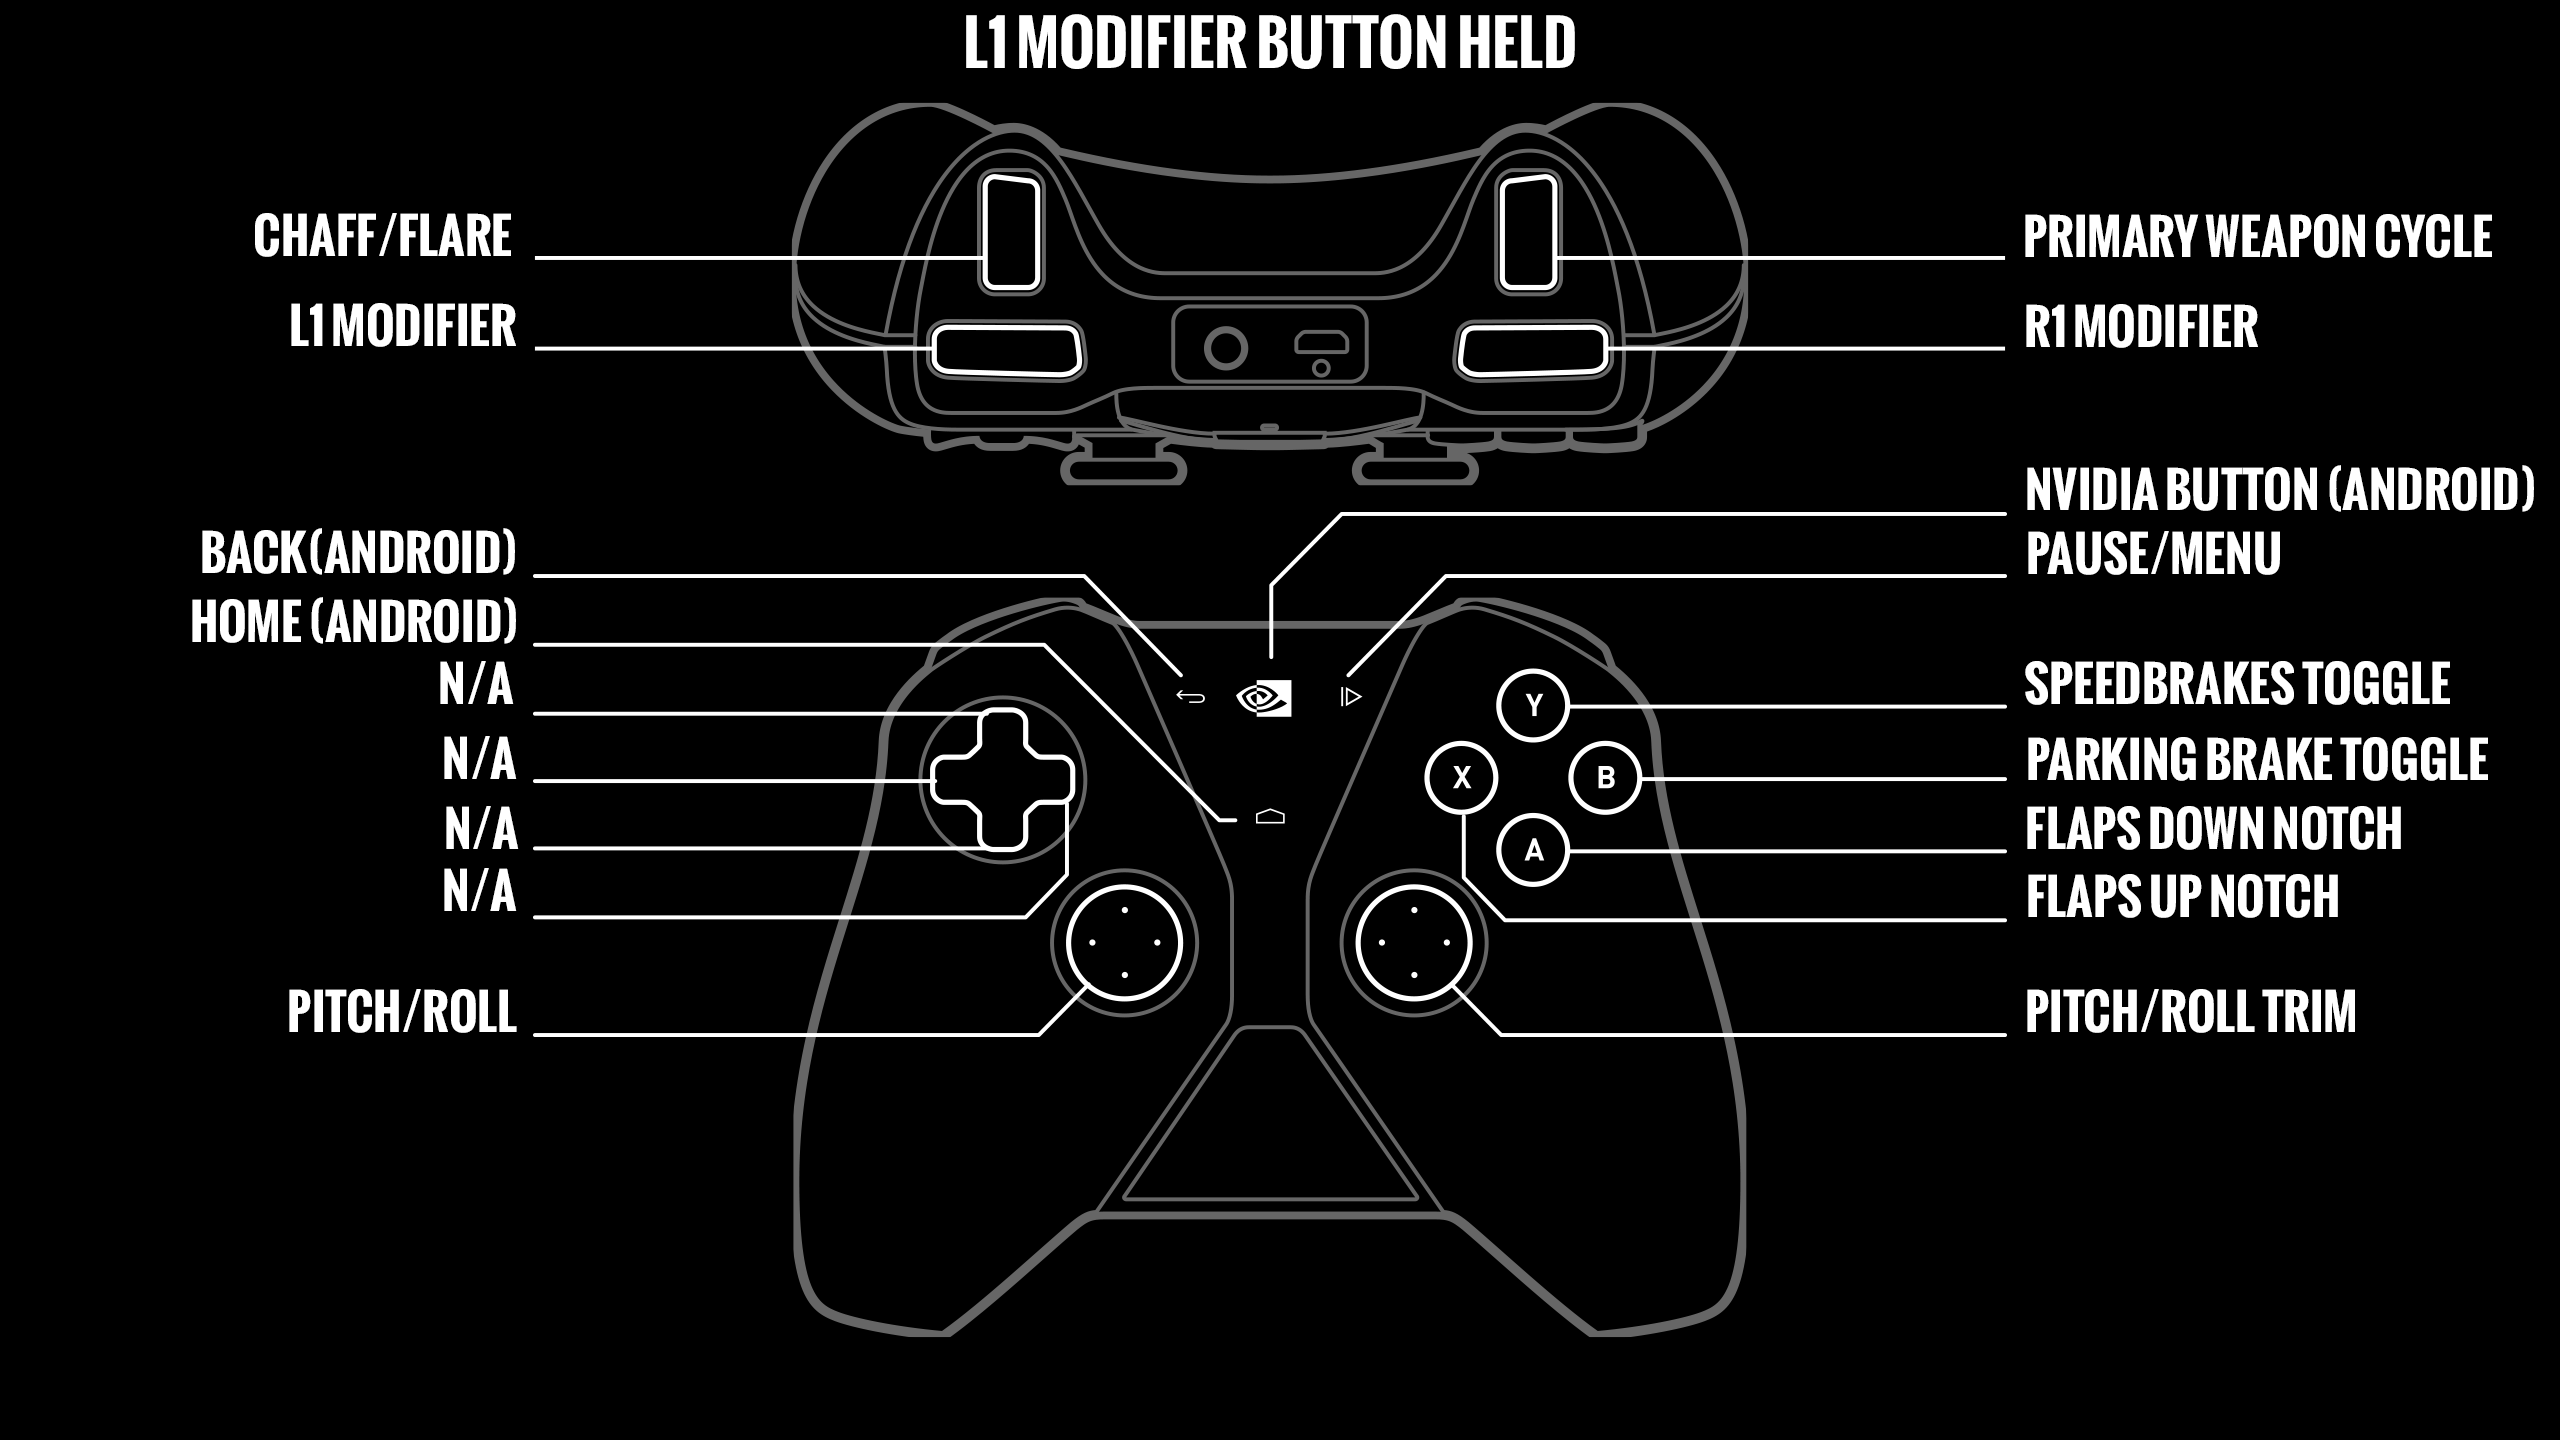
Figure 33: Button assignments when the controller L1 button is pressed and held.
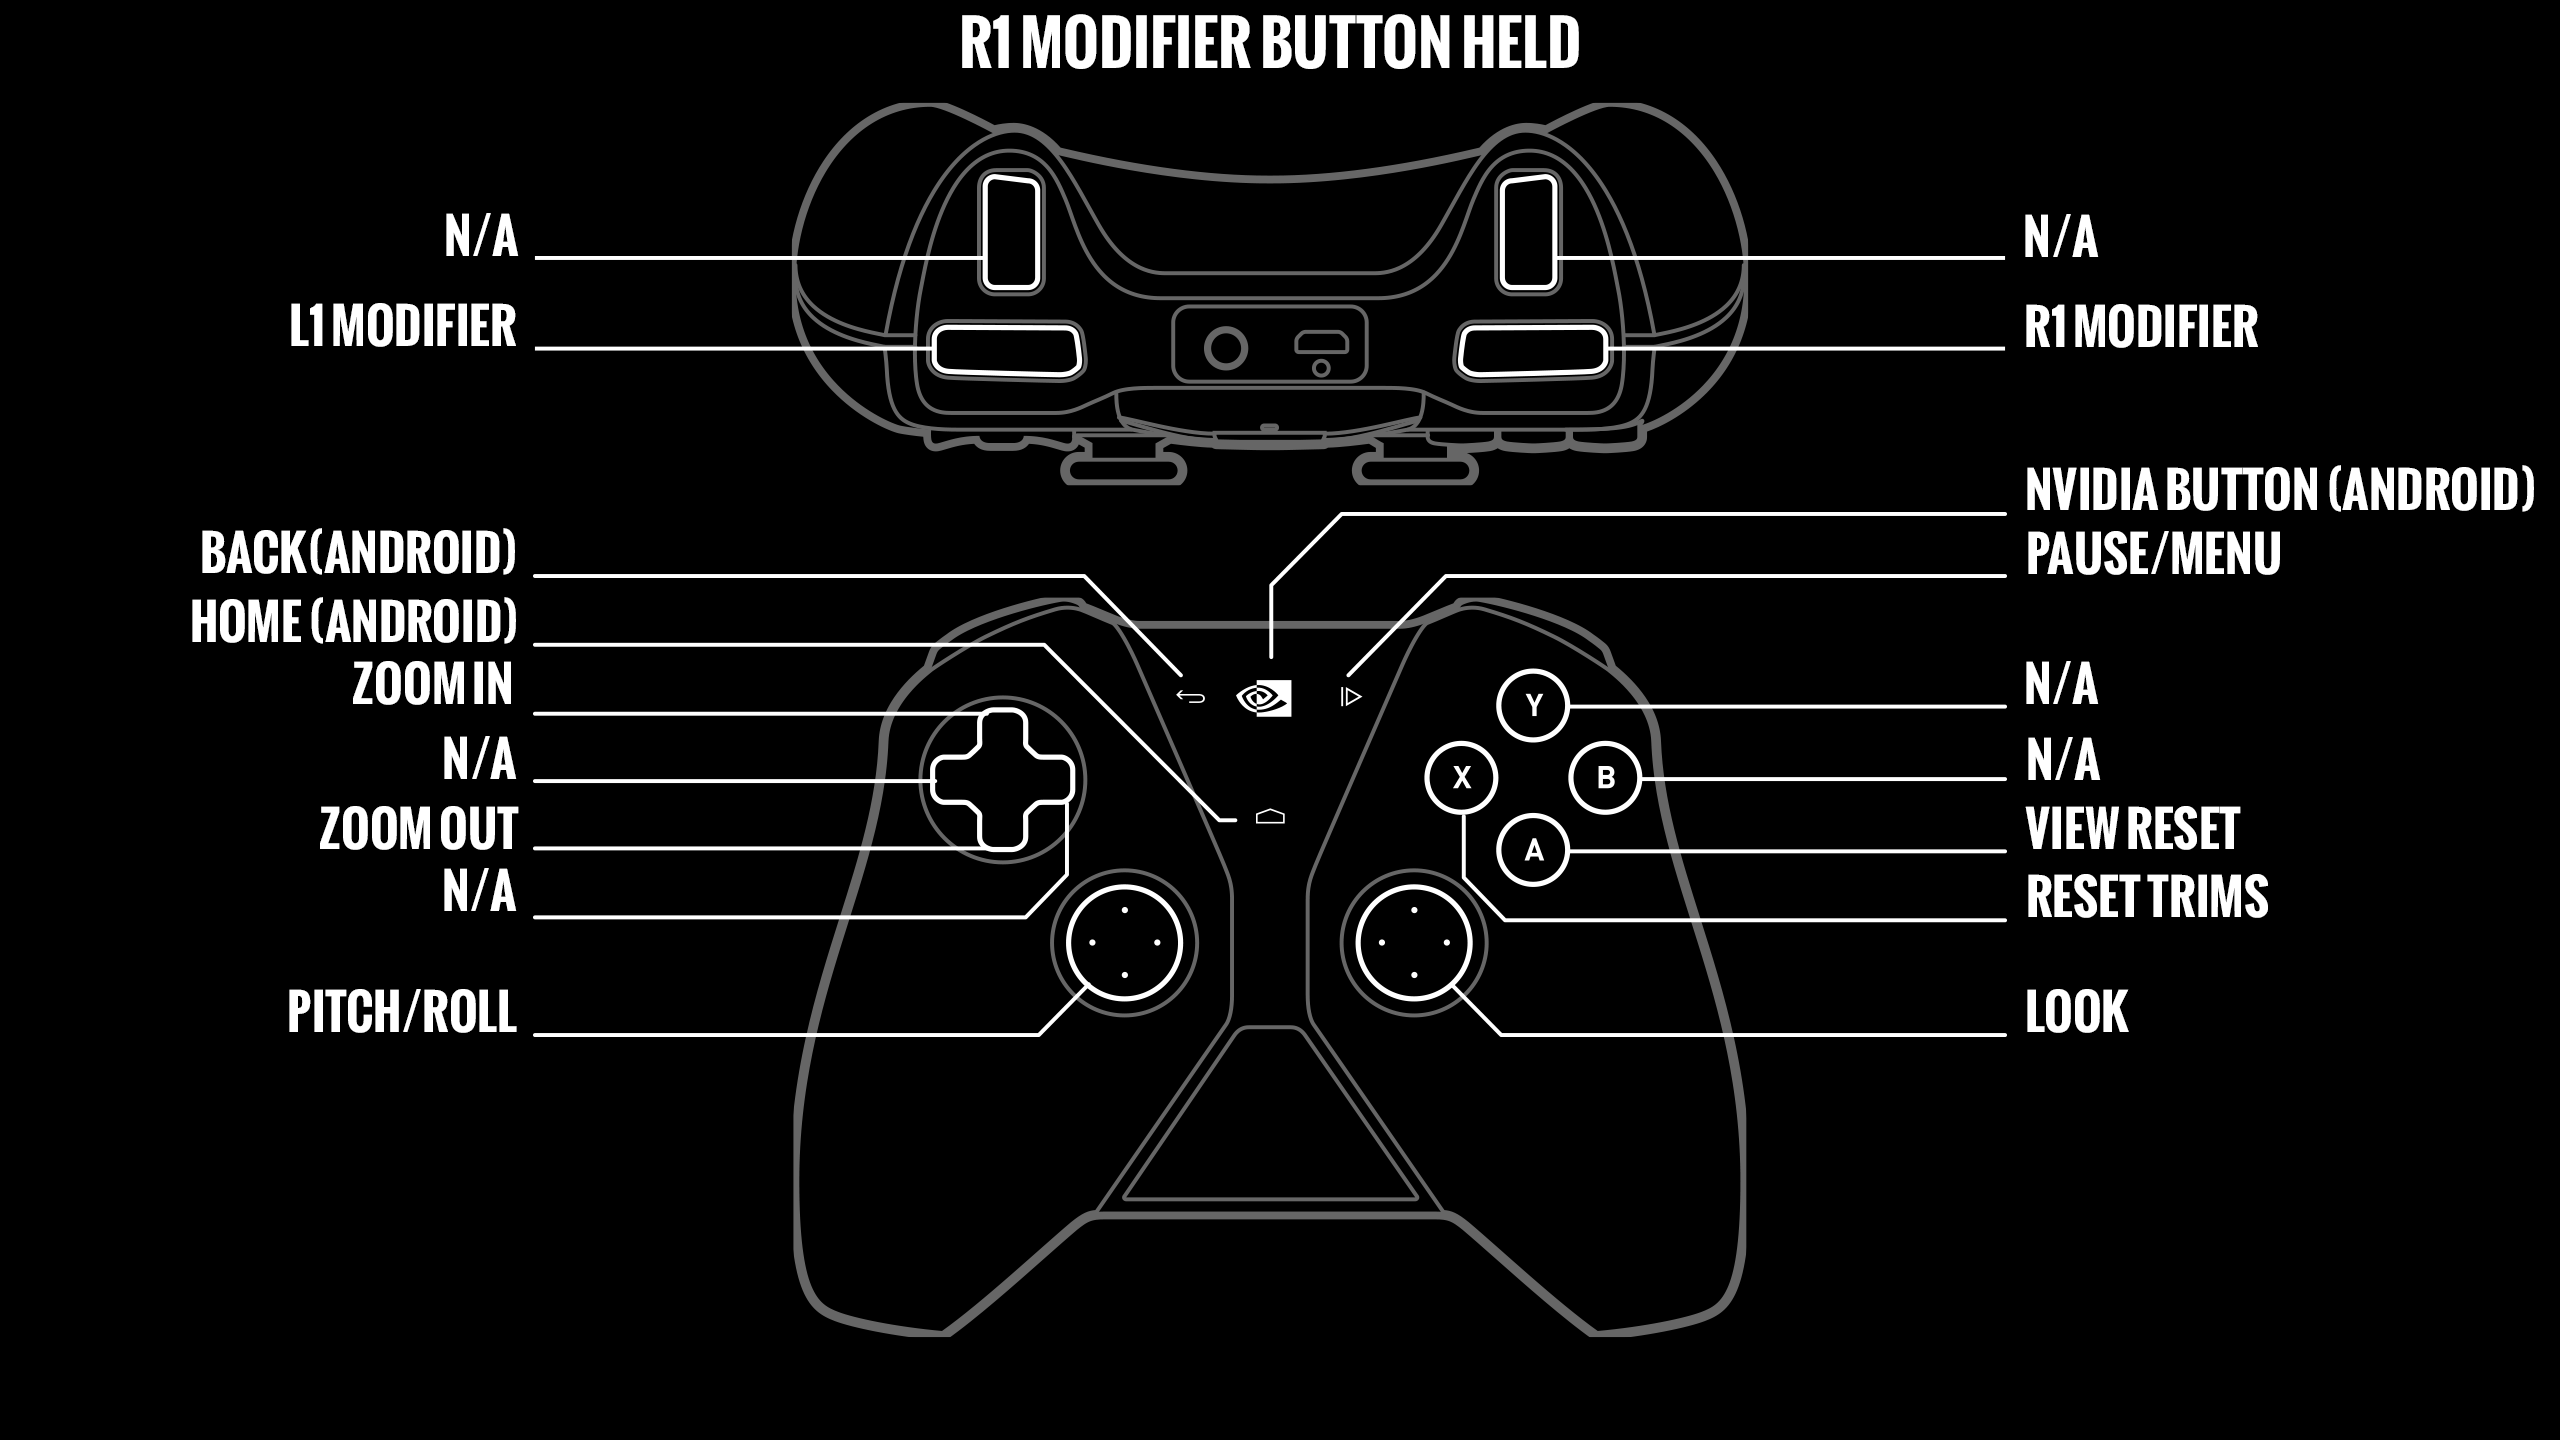
Figure 34: Button assignments when the controller R1 button is pressed and held.
Appendix: Pilot Operating Handbooks
For more information on many of the aircraft included in X‑Plane Mobile, check out the individual Pilot Operating Handbooks on the X-Plane.com support website.
The X-Plane Official Mobile Tutorials playlist also features tutorials and start up procedure videos for many of the X‑Plane Mobile aircraft.
Appendix: Submitting Changes to Scenery
X-Plane Mobile 11.0 and newer includes scenery for the entire world. Airport scenery comes from a community-driven effort to collect airport data into a global airport database. It is a collection of all airport layouts authored by the X‑Plane community over the years. Custom airports made in World Editor (WED) and uploaded to the Gateway are shared with all X‑Plane users via automatic updates to the simulator.
Improvements, bug fixes, and new features are added to X-Plane’s airports by volunteer scenery artists using the free software World Editor (WED). If you see a bug or an improvement needed at an airport, you can file a report on the Gateway Bug Report Form. However, the fastest way to way to get the change made may be to register as a scenery artist yourself, make the change with WED, and submit the scenery to the Gateway.
For additional information or to register as an artist, check out the Airport Scenery Gateway homepage or the Airport Scenery Gateway reference article.
Glossary of Terms
Altitude: An aircraft’s altitude is its height above sea level.
CDI: Course Deviation Indicator. This refers either to the instrument used for navigating a VOR or ILS course, or more specifically to the horizontal bar found in this instrument which displays the aircraft’s lateral position relative to the VOR or ILS course.
DME: Distance Measuring Equipment. An instrument used in navigation which measures distance using the delay between the sending and receiving of a radio signal. Aircraft use this to determine their distance from a fixed NAVAID.
Drag: The aerodynamic force (created by a fluid such as air flowing around an object) that slows the object’s motion.
EFIS: Electronic Flight Instrument System. A flight instrument system (found in an aircraft’s panel) with electronic displays rather than the steam gauges of a standard panel. In X-Plane, such displays are found mostly in jet-engined aircraft.
Glideslope: The angle at which an aircraft approaches (or needs to approach) a runway; often used when discussing navigation by instruments.
Heading: An aircraft’s heading is the direction that its nose is pointing.
IFR: Instrument Flight Rules. The procedure for flying an aircraft based solely on the craft’s instrument panel. Environmental conditions requiring such flight (such as the poor visibility on a rainy day) are referred to as IFR conditions. This is contrasted with VFR conditions (those operating under visual flight rules).
ILS: Instrument Landing System. A ground-based system for guiding approaching aircraft into the runway via radio signals.
Indicated airspeed: The presumed airspeed of a craft as determined by measuring the pressure acting on a little tube attached to the craft which points into the wind. This differs from true airspeed in situations where the air has very little density (for example, at 80,000 feet in an SR-71 Blackbird or in orbit in the Space Shuttle).
Lift: The aerodynamic force (created by a fluid such as air flowing around an object) that pushes an object upward.
Localizer: A localizer is part of an instrument landing system (ILS). It serves as a guide to the centerline of the runway.
Mach speed: The speed of sound through the air. Mach’s number actually describes the speed of sound through any fluid (that is, liquid or gas). In application to aeronautics, though, it is implied that the fluid is air. Note that this number is dependent on a number of factors, such as temperature, humidity, and pressure. Generally, “Mach 1” is cited as 768 miles per hour (the speed of sound at sea level in dry air at 68° Fahrenheit).
NAVAID: A navigation aid transmitter (in X-Plane, either a VOR or ILS) which is used as a reference when flying. These are often found near or on an airport. Pilots often fly from NAVAID to NAVAID on long flights, as a VOR is usable from about 50 miles away.
OBI: Omni-Bearing Indicator. This instrument is found for the most part in X-Plane’s general aviation aircraft. It consists of two moving bars (called the course deviation indicator, or CDI) which points the way to whatever VOR frequency is tuned in the navigation radio. The instrument is set using the Omni-Bearing Selector (or OBS), the knob in its lower left corner.
Pitch: Movement of the aircraft’s nose up or down. See the Flight Dynamics figure below.
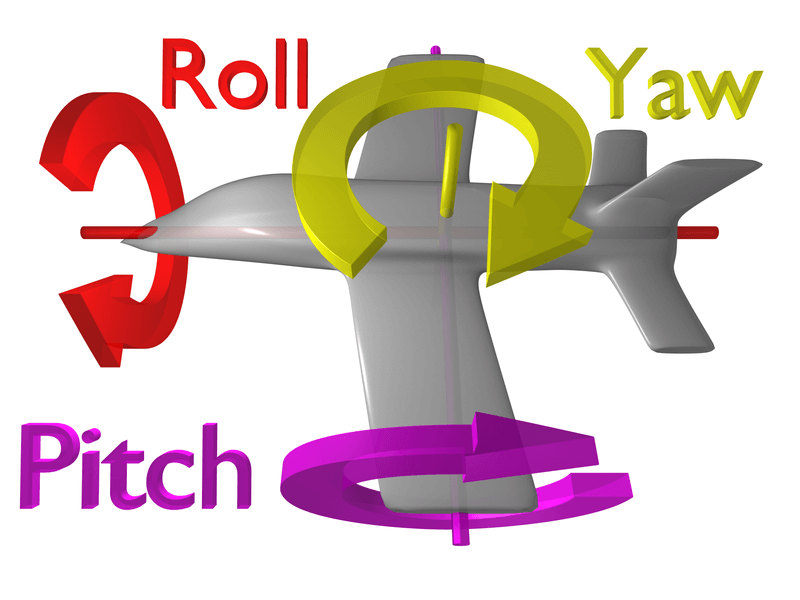
Figure - Flight Dynamics: The image below illustrates the pitch, roll, and yaw axes of an airplane (which also apply to helicopters). Thanks to Wikipedia contributor [ZeroOne](http://en.wikipedia.org/wiki/User:ZeroOne) for releasing this image under the Creative Commons Attribution 3.0 Unported license.
Roll: Movement of the aircraft’s body along the line formed by its body; in an airplane, this is easily seen as the dip or rise of the wings. See the Flight Dynamics figure.
Rotor: The rotating part of a helicopter that generates the craft’s lift; similar in appearance to an oversized airplane propeller, though different in its operation.
RPM: Rotations per minute; a way of measuring the speed of a rotor or propeller. In a helicopter, the RPM of both the main rotor and the tail rotor are held constant.
Rudder pedals: Foot pedals in an airplane used to steer the plane down the runway and to control its yaw motion in flight (that is, the wagging of its tail left or right). Because the iPad and iPhone do not simulate rudder pedals (as it takes input from only two axes rather than three), X‑Plane will automatically control the rudder pedals in an attempt to stabilize the craft’s yaw motion.
Speed: The change in the position of an object over time; unlike velocity, speed does not take into account the direction of the object’s movement.
Speedbrake: Also called and airbrake, this is a flight control surface designed to generate drag in order to slow an aircraft down.
Thrust vector: The direction in which the engine or rotor’s thrust is going; for a helicopter sitting on a helipad with its controls at neutral, this is straight down.
Thrust vectoring: The ability of helicopters and some other aircraft (such as the Harrier or the F-22) to change the direction of the thrust from its engines/rotors.
Update: To update a piece of software is to convert it to a newer version. This should be done every couple months or so in order to take advantage of new features in the simulator.
Velocity: The combination of an object’s speed and the direction of its movement; for example, an aircraft might have a vertical velocity of 500 feet per minute (meaning it moves upward at a rate of 500 feet per minute) or a vertical velocity of -500 feet per minute (meaning it moves downward at 500 feet per minute).
Vertical speed/vertical velocity: The rate at which the aircraft is gaining or losing altitude, typically given in feet per minute.
VFR: Visual Flight Rules. Flying done using a combination of the pilot’s view of the outside world and the aircraft’s instruments. Environmental conditions permitting such flight (such as a sunny day with 10 mile visibility) are referred to as VFR conditions.
VOR navigation: Very High Frequency Omnidirectional Range navigation; this is navigation based on radio signals sent out by a VOR beacon. Light airplanes often track these signals using an Omni-Bearing Indicator, or OBI.
Yaw: Movement of the aircraft’s body left or right, most easily pictured as a wagging of the aircraft’s tail. See the Flight Dynamics figure.